This post may contain affiliate links. See my disclosure policy.
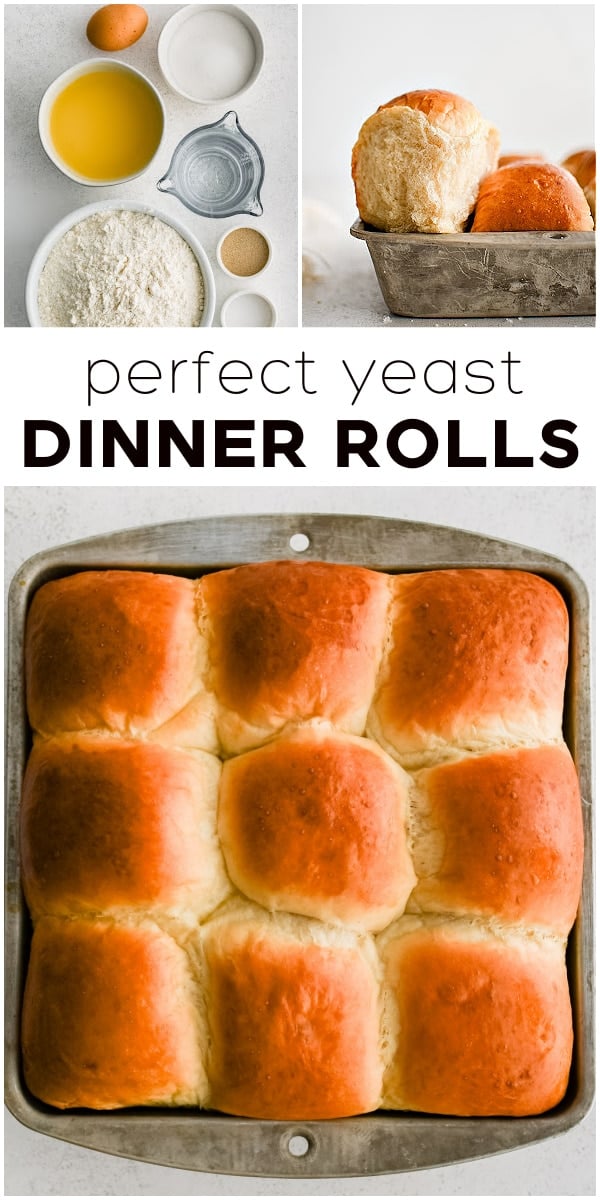
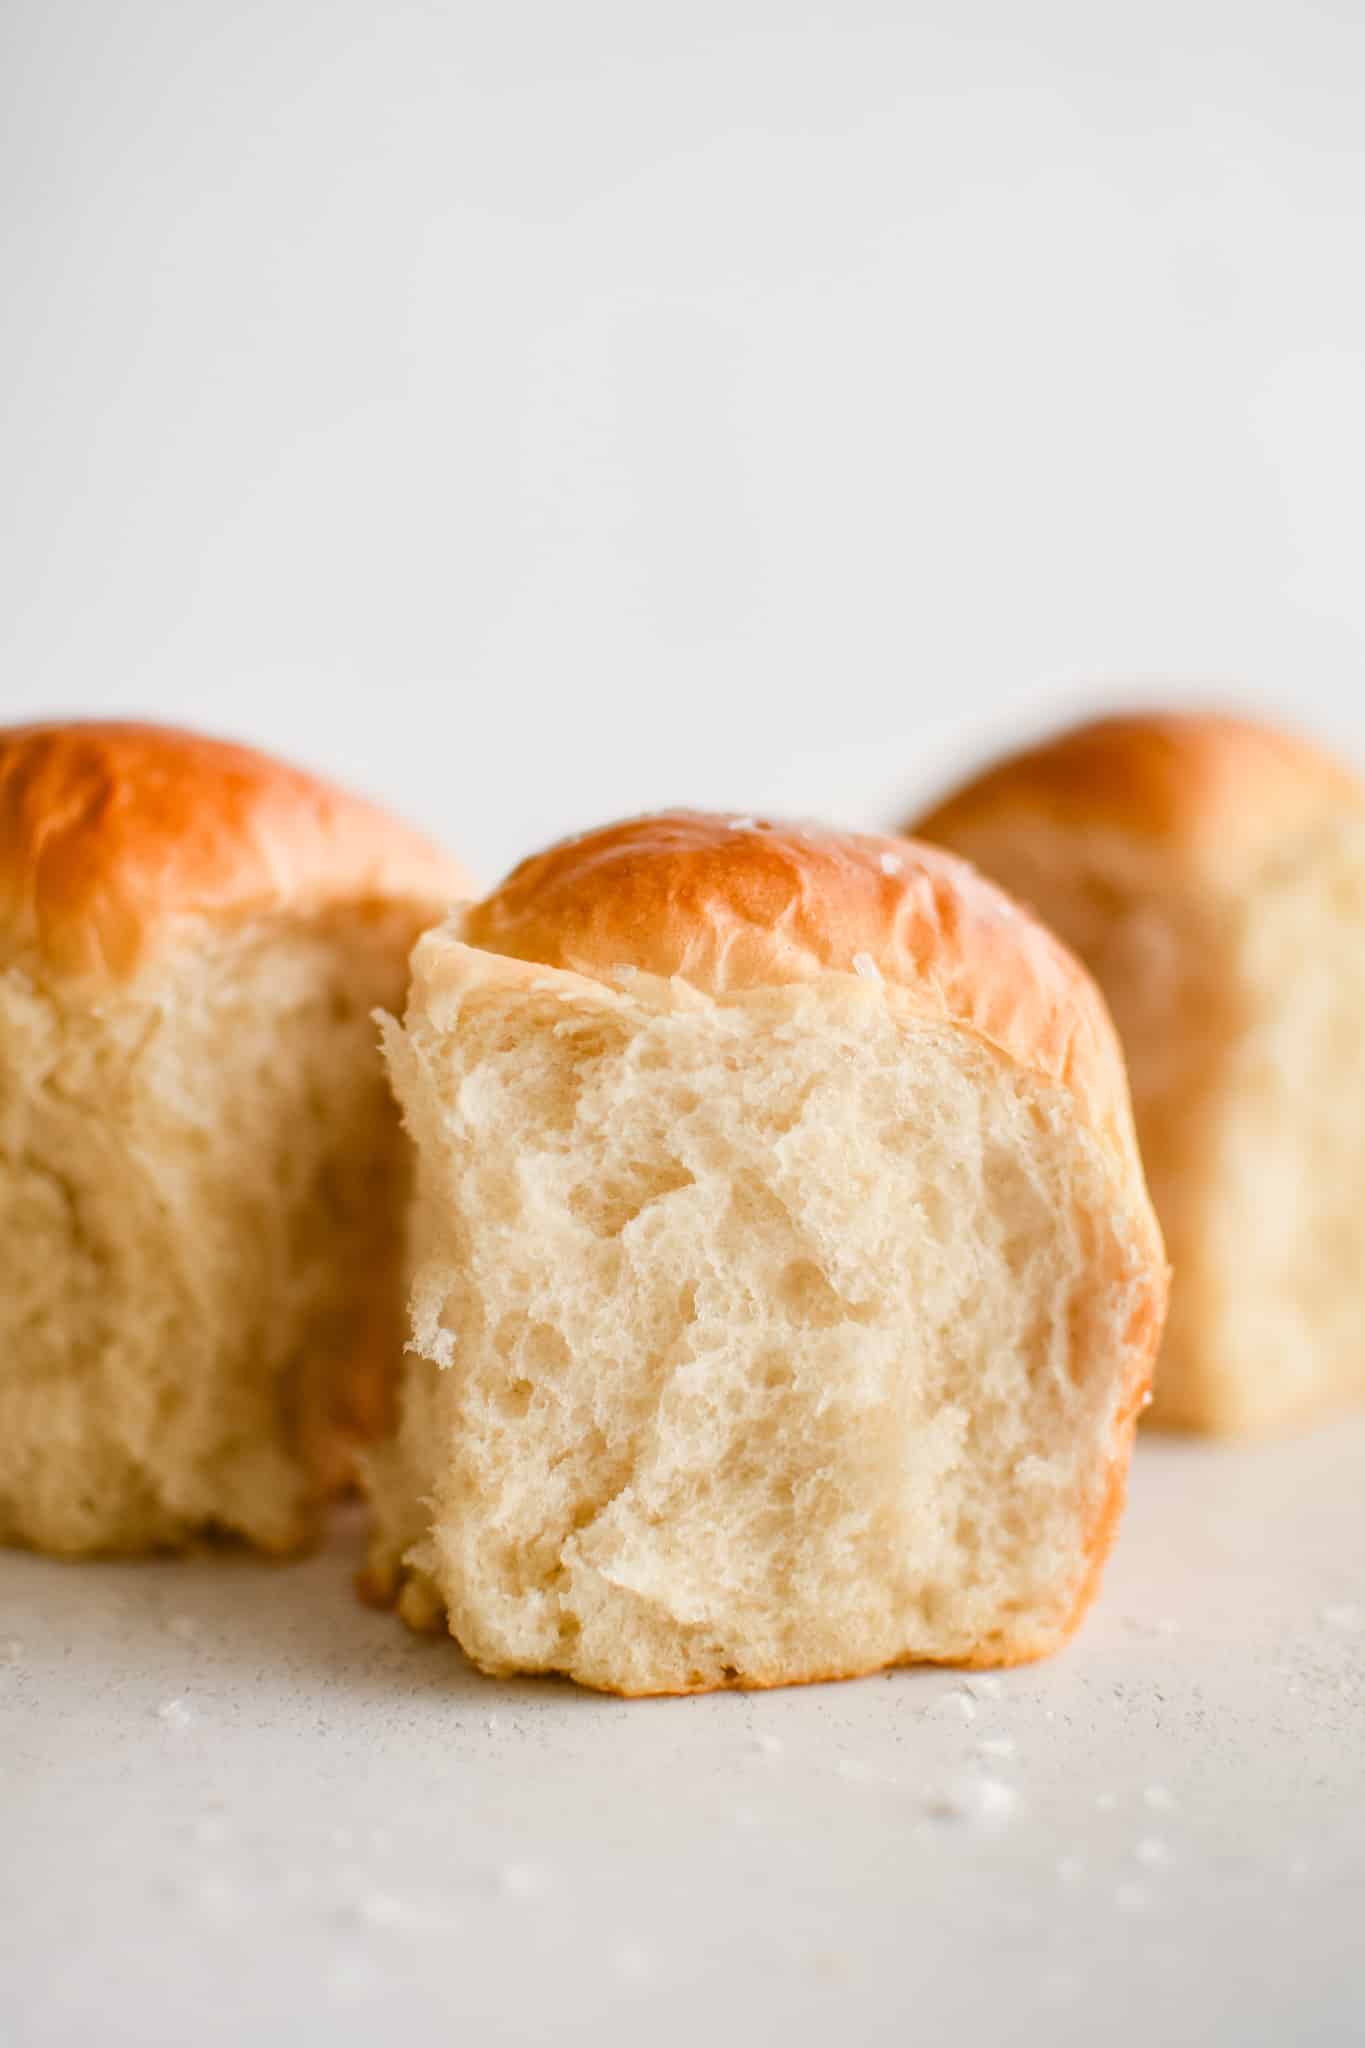
These irresistibly soft, buttery, and fluffy Homemade Dinner Rolls are the perfect addition to any weeknight dinner or holiday table. Made with just seven ingredients!

Table of Contents
Baking homemade dinner rolls can be intimidating, especially when terms like “active dry yeast” and “proofing” come into play. The good news is that these delicious dinner rolls are truly easy, requiring only 7 simple ingredients: warm water, granulated sugar, active dry yeast, butter, all-purpose flour, salt, and an egg. The result is soft, pillowy dinner rolls bursting with sweet, buttery flavor.
Whether you’re new to baking or just want reliable results, this recipe is packed with step-by-step guidance and pro tips so you can create flawless yeast rolls every single time.
At a Glance
- Total Time: About 3 hours 15 minutes (includes proofing and baking)
- Servings: 9 to 12 dinner rolls
- Special Diets: Vegetarian-friendly
- Best For: Holiday meals, Sunday family dinners, or any occasion where fresh bread completes the table (always)
- Customizable: Adjust the size and shape (9 large rolls or 12 smaller rolls), substitute milk for water, or finish with butter or flaky sea salt
- Make-Ahead: Options include overnight refrigerator rise, freezing shaped rolls for up to 3 months, or par-baking for quick finishing later
Overview: How to Make Dinner Rolls
Feel free to grab the full, printable recipe below by clicking on Jump to Recipe.
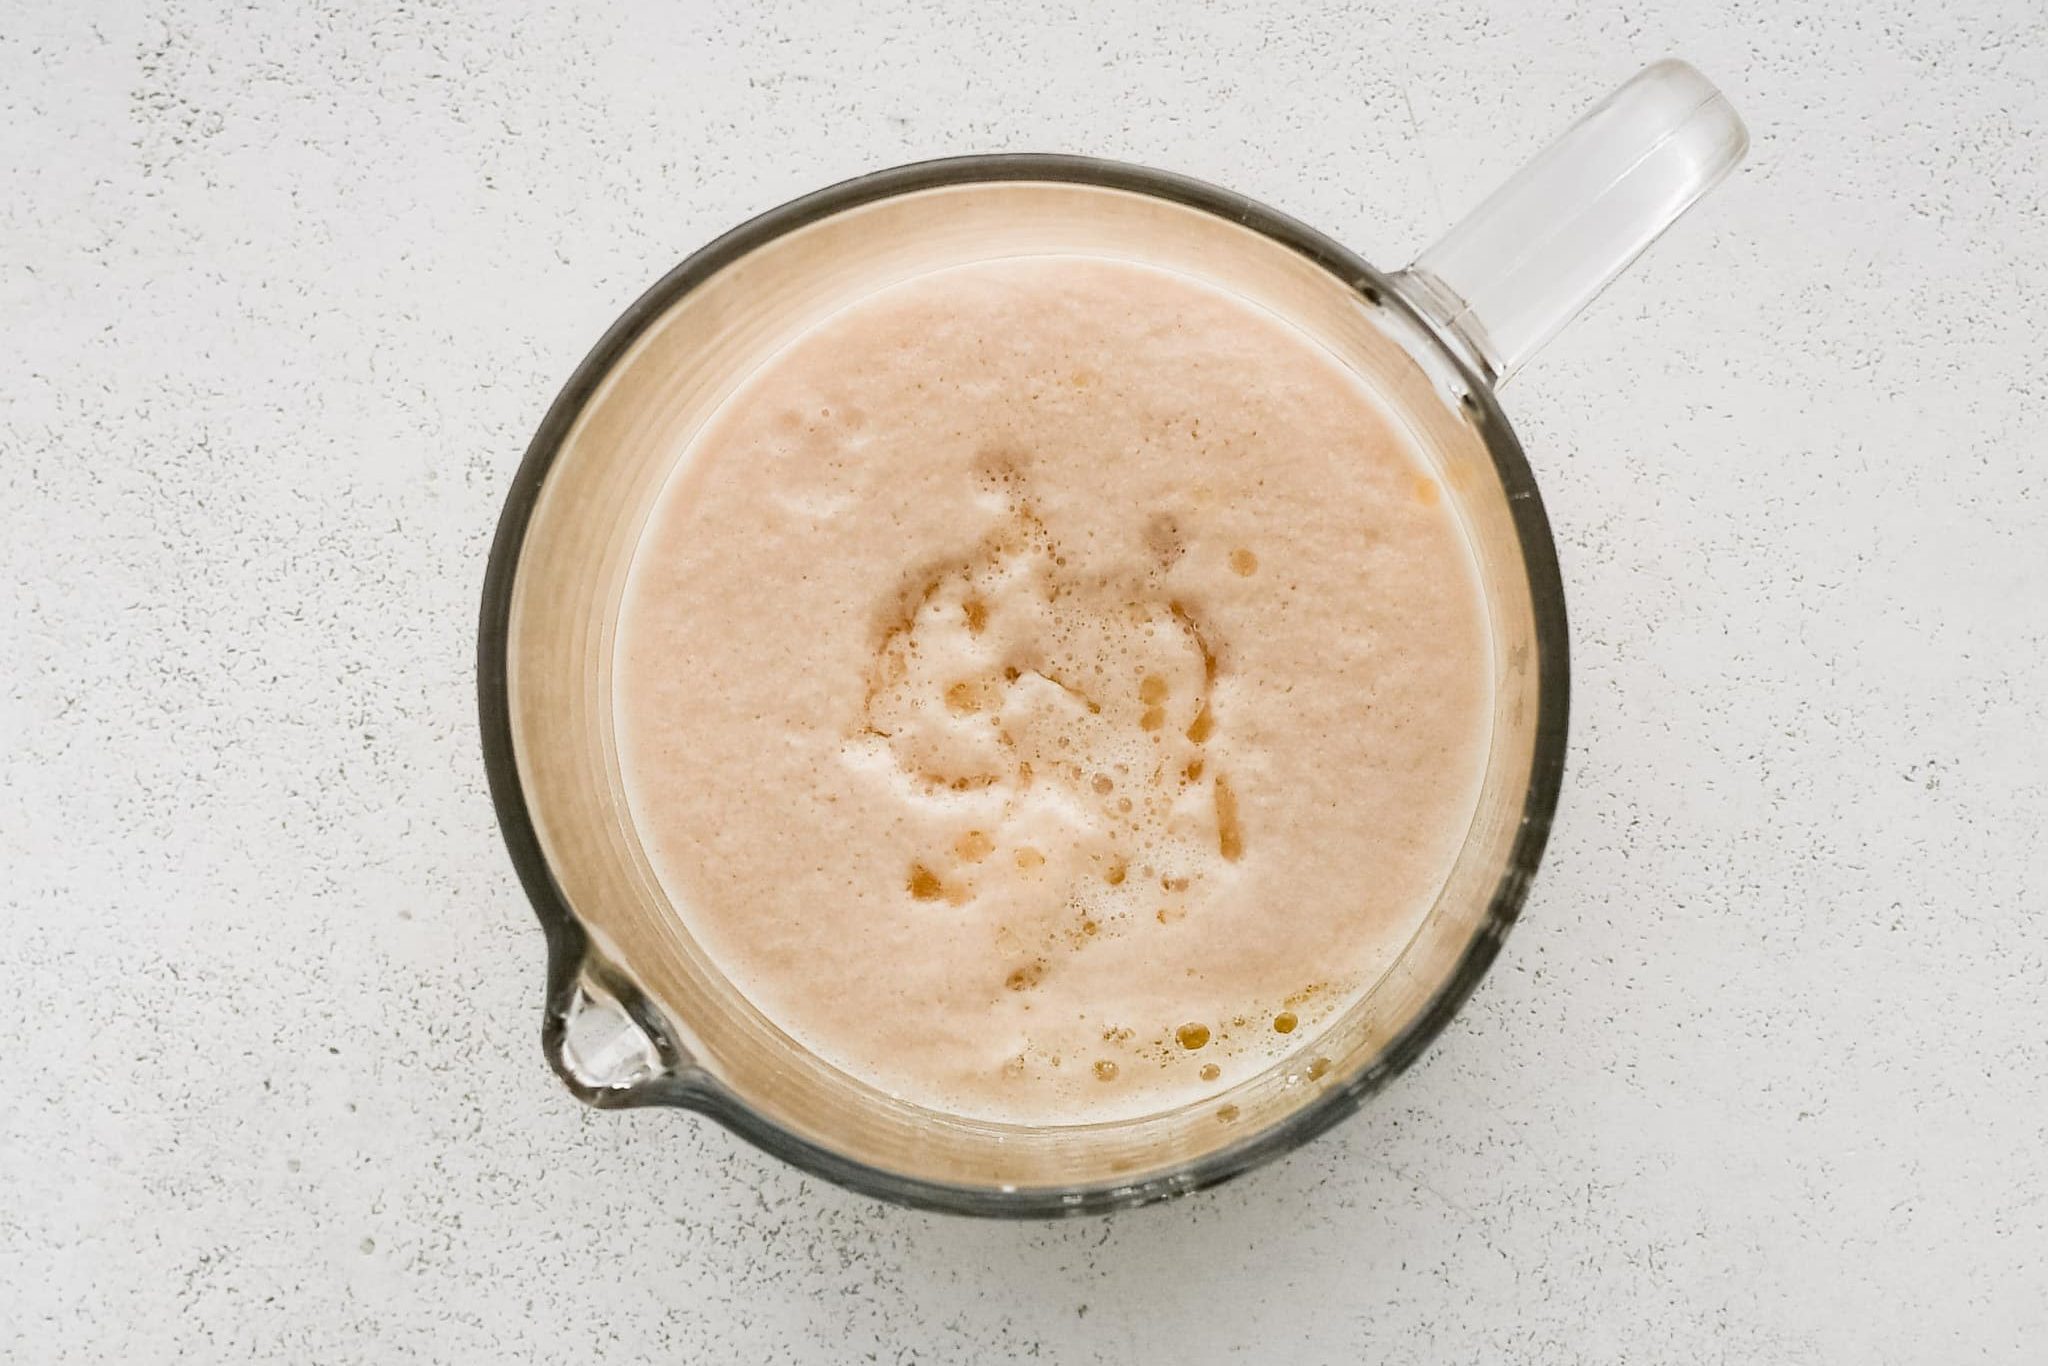
- Activate the Yeast: Whisk warm water, a spoonful of sugar, and active dry yeast in a bowl. Let it sit for 5 to 10 minutes until foamy (image 1).
- Mix and Knead: Combine the flour, salt, and the remaining sugar in a mixer bowl. Add the proofed yeast and softened butter, then knead on medium-low for 5 to 7 minutes until the dough is smooth and elastic. Use the windowpane test to check readiness.
- First Rise: Place the dough in a lightly oiled bowl (image 2), cover, and let it rise in a warm spot until doubled in size, about 1 to 2 hours (image 3).


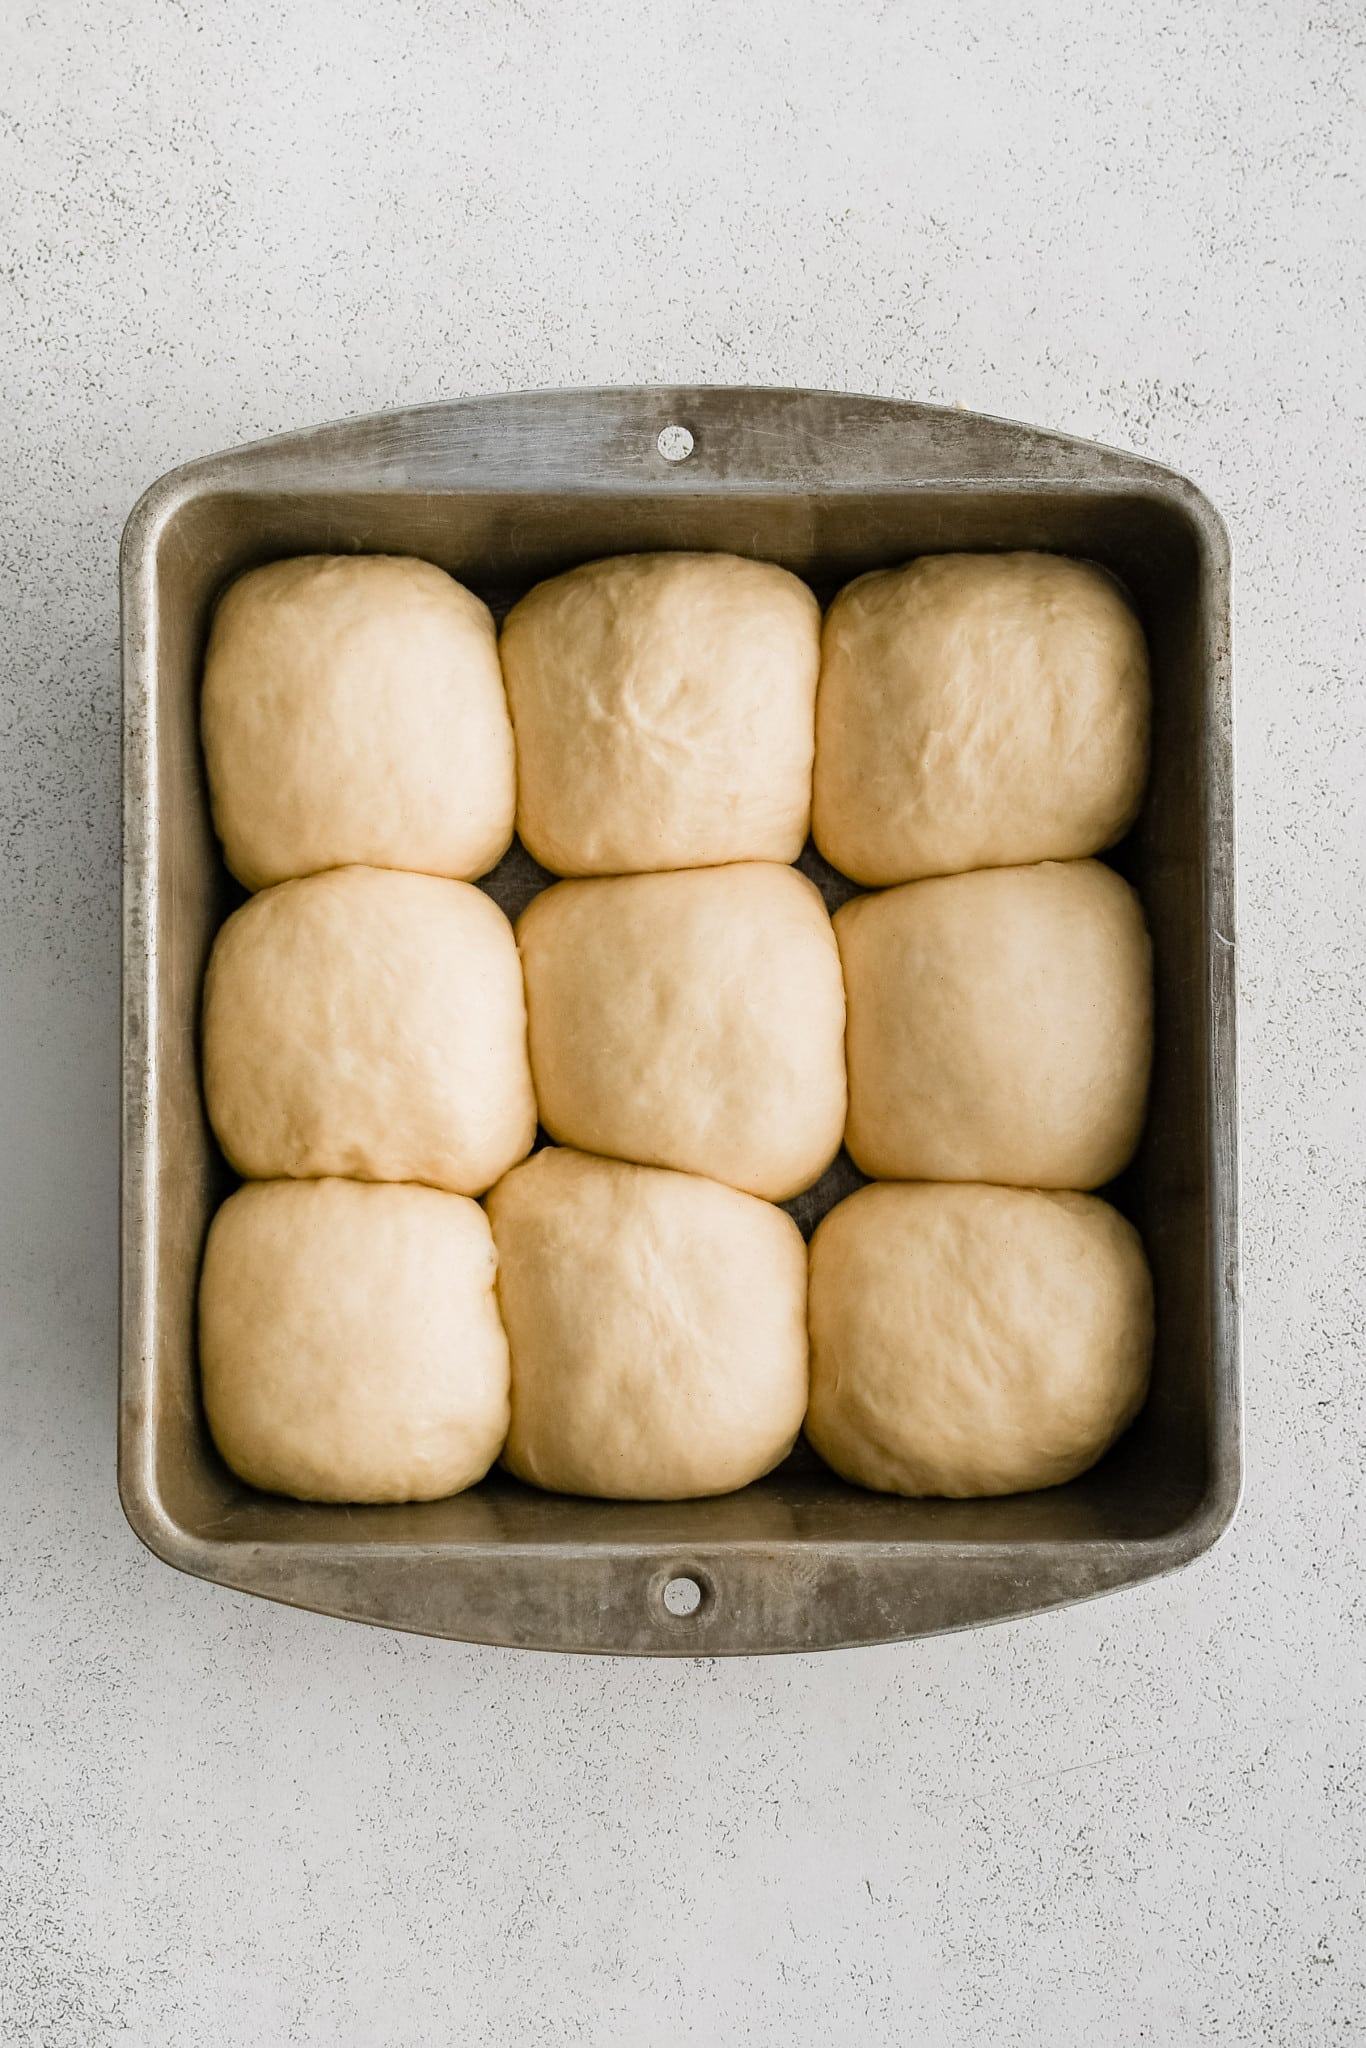
- Shape the Rolls: Punch down the dough and divide it into 9 to 12 pieces. Shape each into a smooth ball (image 4 & 5) and arrange in a greased baking dish (image 6). See tips on shaping below.


- Second Rise: Cover the dish and let the rolls rise again for 30 to 60 minutes until puffy (image 7).
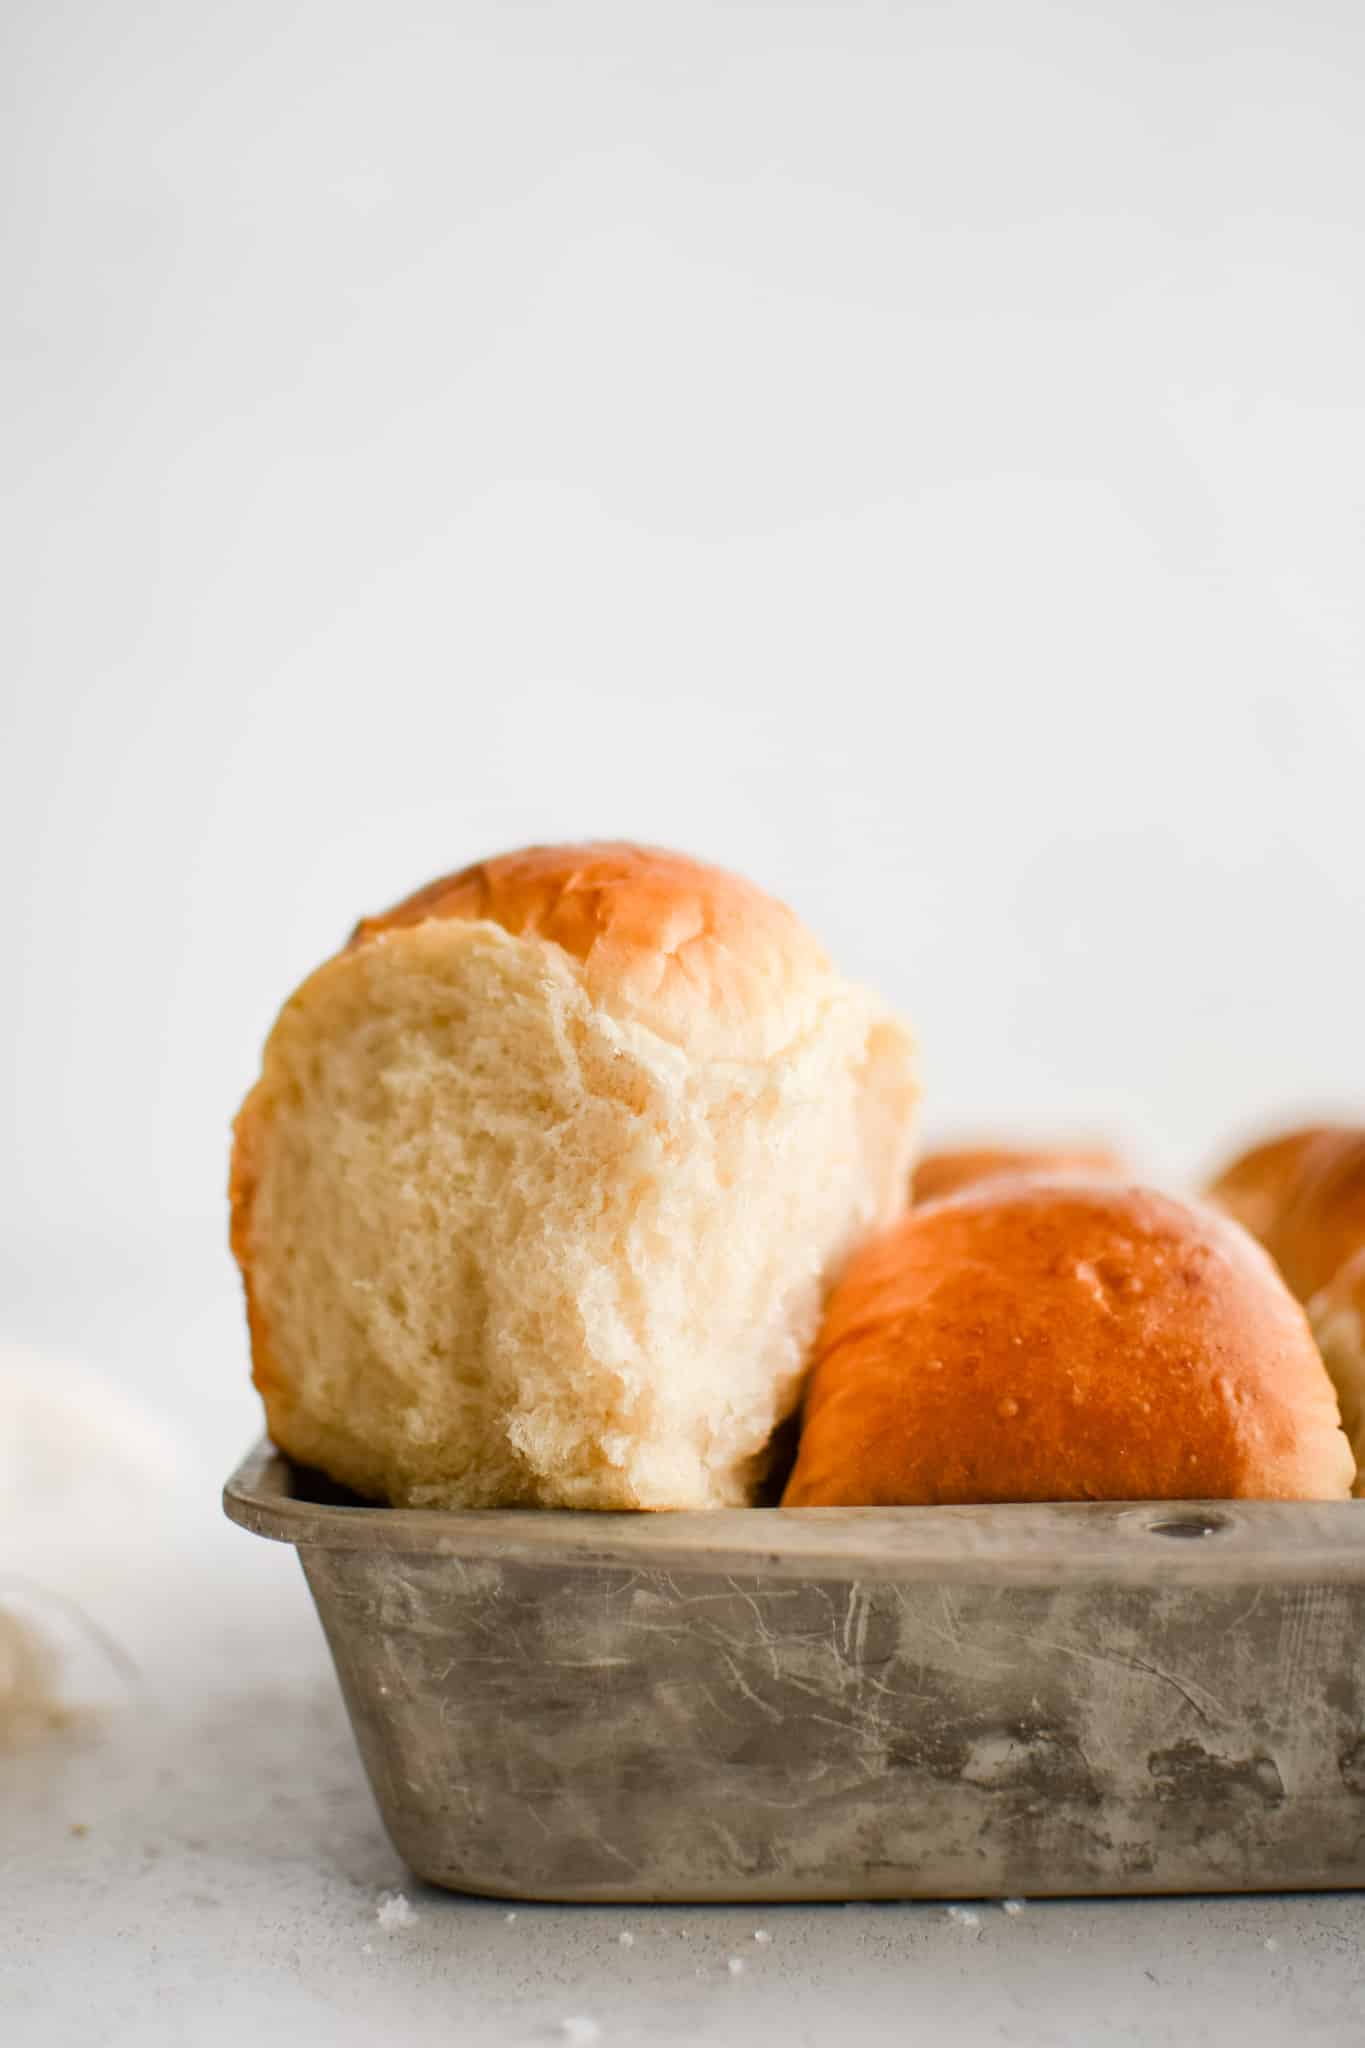
- Bake: Brush the tops with egg wash (image 7) and bake at 350°F for 20 to 25 minutes, rotating the pan halfway through (image 8). Tent with foil if browning too quickly. Cool slightly before serving.


How to Shape Dinner Rolls
The classic shape for dinner rolls is a boule, a smooth round ball of dough with a tight surface and sealed seam underneath. This simple method helps the rolls rise evenly and bake up soft, golden, and fluffy.
- Divide the Dough: After the first rise, punch down the dough and divide it into 9 to 12 equal pieces. A kitchen scale helps ensure even sizes.
- Flatten Lightly: Press each piece into a small disk with your hand.
- Cup and Roll: Place the disk in your palm and use a gentle circular motion to tuck the edges under, forming a smooth ball.
- Seal the Bottom: Pinch the seam underneath to hold its shape.
- Arrange to Proof: Place the shaped rolls seam-side down in a greased baking dish, leaving a little space for them to expand during the second rise.

Tips for Making Homemade Dinner Rolls
- Use Fresh, Active Yeast: First things first, it’s vital that you’re using yeast that is not expired. Proof the yeast in warm water (100°F to 110°F) and make sure that it foams and bubbles within 10 minutes.
- Weigh your flour: Scooping flour with a cup can pack it down, adding up to 25% more than intended. For consistent results, use a kitchen scale (1 cup all-purpose flour = 120-125 grams).
- Liquid Temperature Matters: Water or milk that’s too hot can kill yeast, while liquid that’s too cold won’t activate it. Stay within the 100°F to 110°F range.
- Knead Properly: Knead until the dough is smooth, elastic, and slightly tacky. Avoid over-kneading, and use the windowpane test to check readiness.
- Let the Dough Rise: Let your dough rise in a warm environment until it has doubled in size. Depending on the temperature, this takes 1-2 hours (first rise).
How to Make Yeast Rolls Ahead of Time
These rolls require about 3 hours of rising. With these simple methods, you can prep the dough ahead and still serve warm, fluffy rolls whenever you need them:
- Overnight Rise: After the first rise, shape the rolls, place them in a greased dish, and cover tightly. Refrigerate up to 18 hours, then let rise at room temperature for 1 to 2 hours before baking.
- Freeze Shaped Rolls: After the first rise, shape the rolls and freeze on a baking sheet until solid. Transfer to an airtight container for up to 3 months. Thaw and rise at room temperature for 2 to 3 hours before baking.
- Par-Bake: This method partially bakes the dinner rolls, allowing you to finish baking them just before serving. Bake the shaped rolls at 275°F for 10 to 15 minutes until set but pale. Cool completely, then store at room temperature for 2 days or freeze up to 3 months. Finish baking at 375°F for 10 to 15 minutes until golden.
Frequently Asked Questions
The windowpane test shows if the dough has been kneaded enough. Pinch off a small piece and gently stretch it between your fingers. If it becomes thin and translucent without tearing, like a ‘windowpane’, the gluten is developed and the dough is ready. If it tears, knead for a few more minutes and test again.
Yes. Instant yeast can be used in place of active dry yeast. Since it doesn’t need proofing, you can mix it directly with the dry ingredients. Keep the liquid temperature around 100°F to 110°F and follow the recipe as written. Expect the dough to rise a little faster, so check it early.
Store baked rolls in an airtight container or wrapped tightly in foil at room temperature for up to 3 days. For longer storage, freeze cooled rolls in a freezer-safe bag for up to 3 months. To reheat, warm them in a 300°F oven for 8 to 10 minutes until soft and heated through.
Cooking Tools for this Recipe:
Check out all of my kitchen essentials. (Amazon affiliate links*)
- Stand Mixer + Attachments: Mixes and kneads the dough so that you don’t have to do it by hand.
- Digital Food Scale: To accurately measure the ingredients.
- Bench Scraper: This is used to cut the dough into even sections.
- Instant Read Thermometer: To make sure your water isn’t too warm.
- Glass Mixing Bowls
- 9×9-inch Baking Pan or 9×13-inch Baking Pan
- Pastry Brush
More Homemade Bread Recipes


If you make this recipe, I’d love to hear what you think! Please leave a comment and a star rating below, your feedback helps other readers discover (and enjoy) this recipe too. Thank you so much! 💛
Homemade Dinner Rolls
Ingredients
- 1 cup warm water, (between 100°F and 110°F)
- ¼ cup granulated sugar, divided
- 2 teaspoons active dry yeast, (1 packet)
- ½ cup softened butter, see notes
- 3 cups all-purpose flour
- 1 teaspoon salt
- 1 egg, plus 1 tablespoon water
Instructions
- In a medium bowl, whisk together the water (between 100°F and 110°F), one tablespoon of granulated sugar, and active dry yeast. Set aside to proof for 5-10 minutes.
- As the yeast is proofing, whisk together the flour, salt, and remaining sugar in the bowl of a large mixer fitted with the dough hook or paddle attachment. After the yeast has activated, add it and the softened butter to the flour.
- Beat/mix on low speed for 30 seconds, then scrape down the sides of the bowl with a silicone spatula. Continue kneading the dough for a full 5-7 minutes at medium-low (2x) speed. The dough should form a smooth, elastic ball that pulls away from the sides without sticking too much. If the dough is too sticky, add a little more flour, one tablespoon at a time.
- First Rise: Lightly spray a large, clean glass bowl with cooking spray or lightly coat it with oil. Place the dough in the bowl, gently turning to coat all sides with oil. Cover the bowl with plastic wrap or a clean kitchen towel. Allow the dough to rise in a warm (no warmer than 90°F), draft-free area for about 1-2 hours or until it has doubled in size.
- Grease a 9×9-inch baking pan (or a 9×13-inch baking dish if making 12 rolls). Once the dough is ready, punch it down to release the CO2 and turn it out on a clean work surface (do not grease or flour the countertop). Divide the dough into 9-12 equal pieces (a bench scraper is helpful for cutting dough). (I used a scale to get nine equally sized pieces that weighed approximately 3.35 oz each.)
- Gently flatten each piece with your hand into a rough disk shape. To shape into balls, gently cup the piece of dough in your palm. Working in a circular motion, use the edges of your palm and fingers to tuck the dough under itself, creating a smooth, tight ball. Pinch the seams at the bottom of the balls and tuck them underneath. Arrange in the prepared baking pan.
- Second Rise: Cover the baking dish with plastic wrap or a clean kitchen towel and let them rise for 30-60 minutes, or until puffy.
- Adjust the oven rack to a lower position and preheat the oven to 350°F.
- Whisk the egg and water in a small bowl until no lumps remain. Once the rolls are ready, brush the tops with the egg wash just before baking.
- Bake the rolls for 20-25 minutes or until the tops spring back within a second of being gently pushed with your finger (always check the middle roll first since it will take the longest to bake). Rotate the pan halfway through cooking. If the tops start to brown too quickly, tent the pan loosely with aluminum foil. Cool for a few minutes before serving.
- Serve with flaky sea salt or brush the tops with melted butter, if desired.
Notes
- I will usually melt the butter slightly in the microwave and then let it return to room temperature.
- Whole milk may be used in place of the water.
- The Windowpane Test is used to check whether your dough has been kneaded long enough to develop proper strength and elasticity. To perform the test, pinch off a small golf-ball-sized piece of dough and hold the dough between your fingers. Slowly stretch it out, pulling it from the center outward. As you stretch, the dough should become thin and translucent in the center without tearing, like a thin “windowpane” that you can almost see through. If you can’t see through, continue kneading for a couple more minutes.
Nutrition
Nutrition information is automatically calculated, so should only be used as an approximation.


Totally loved the ease of this recipe and the rolls turned out great!
Thanks, Peg, I am happy to hear they turned out great 🙂