This post may contain affiliate links. See my disclosure policy.

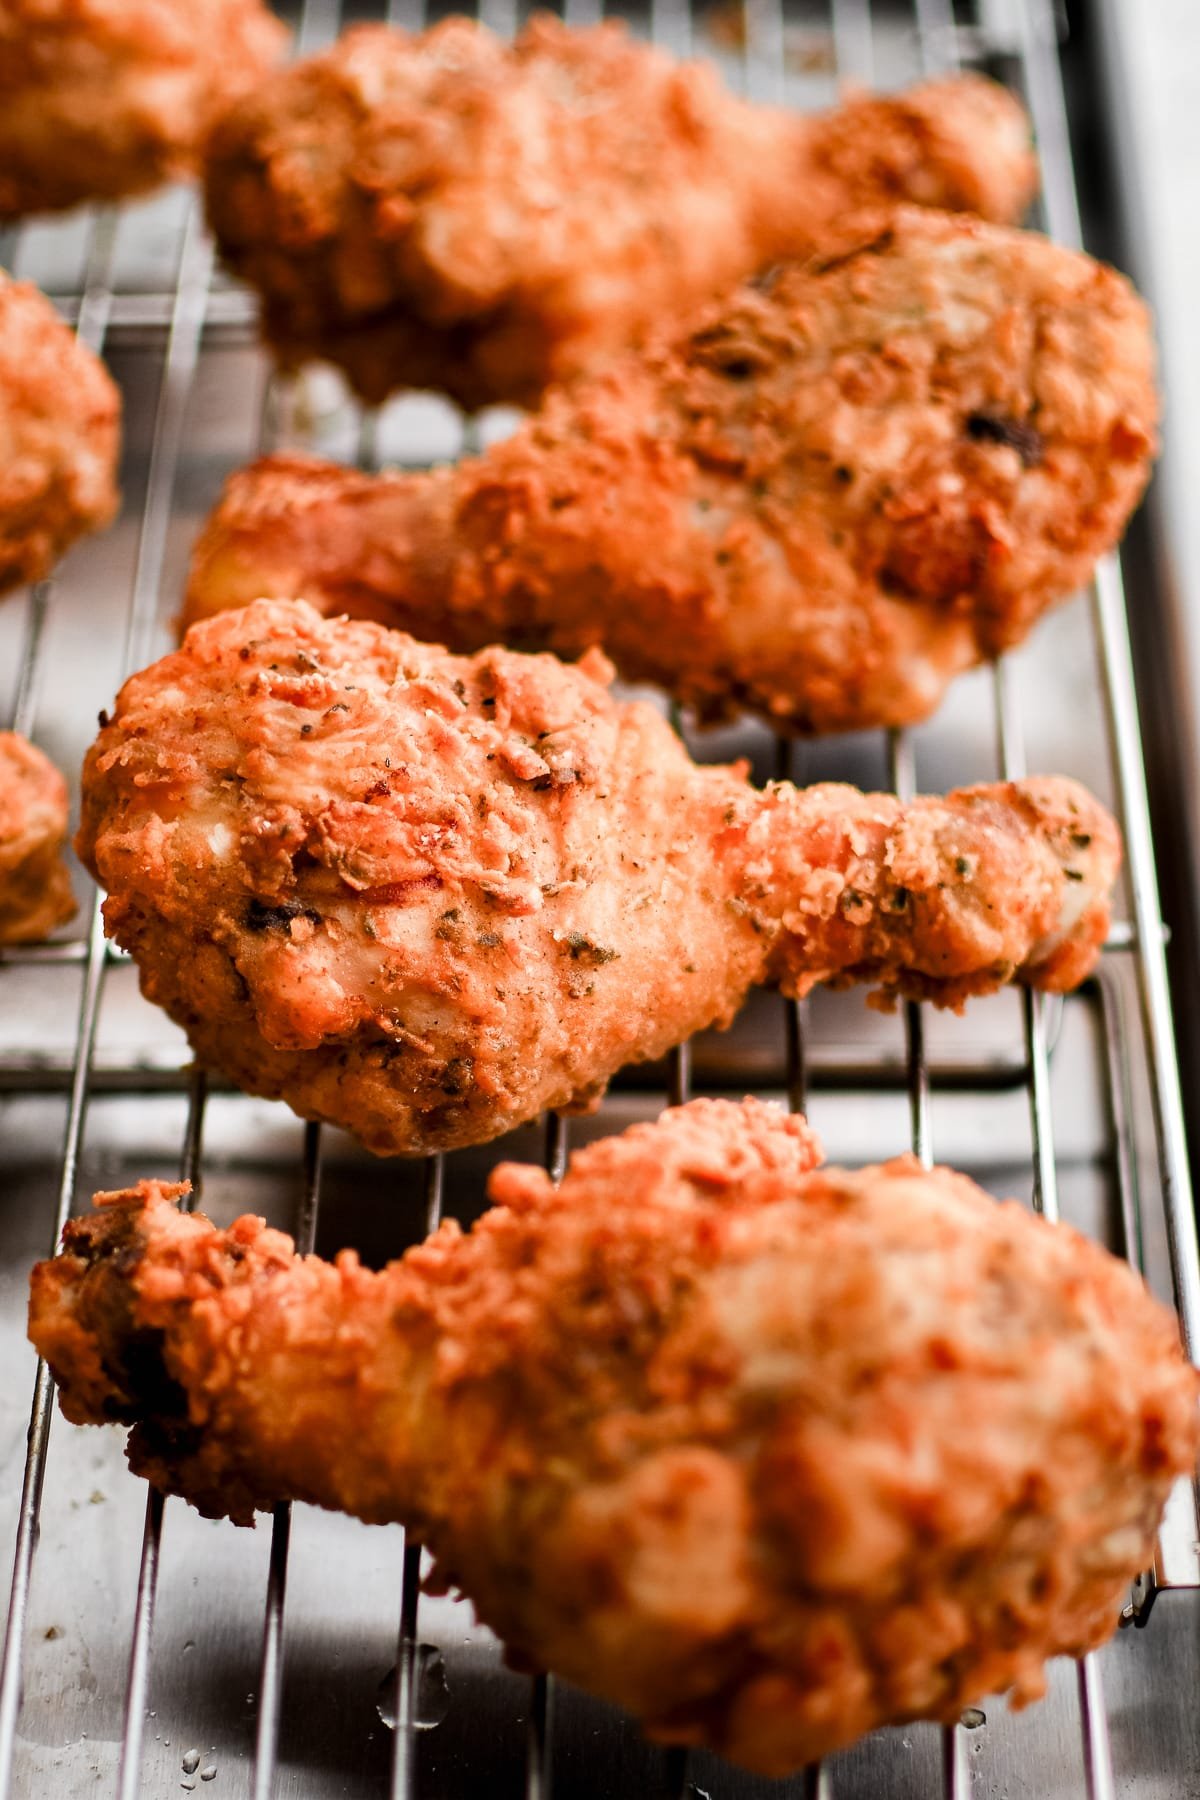
This Souther Buttermilk Fried Chicken Recipe delivers perfectly tender, juicy, delicious meat with a crispy golden-brown crust. The secret, of course, is buttermilk! A slightly acidic meat tenderizer perfect for marinating any cut of chicken.
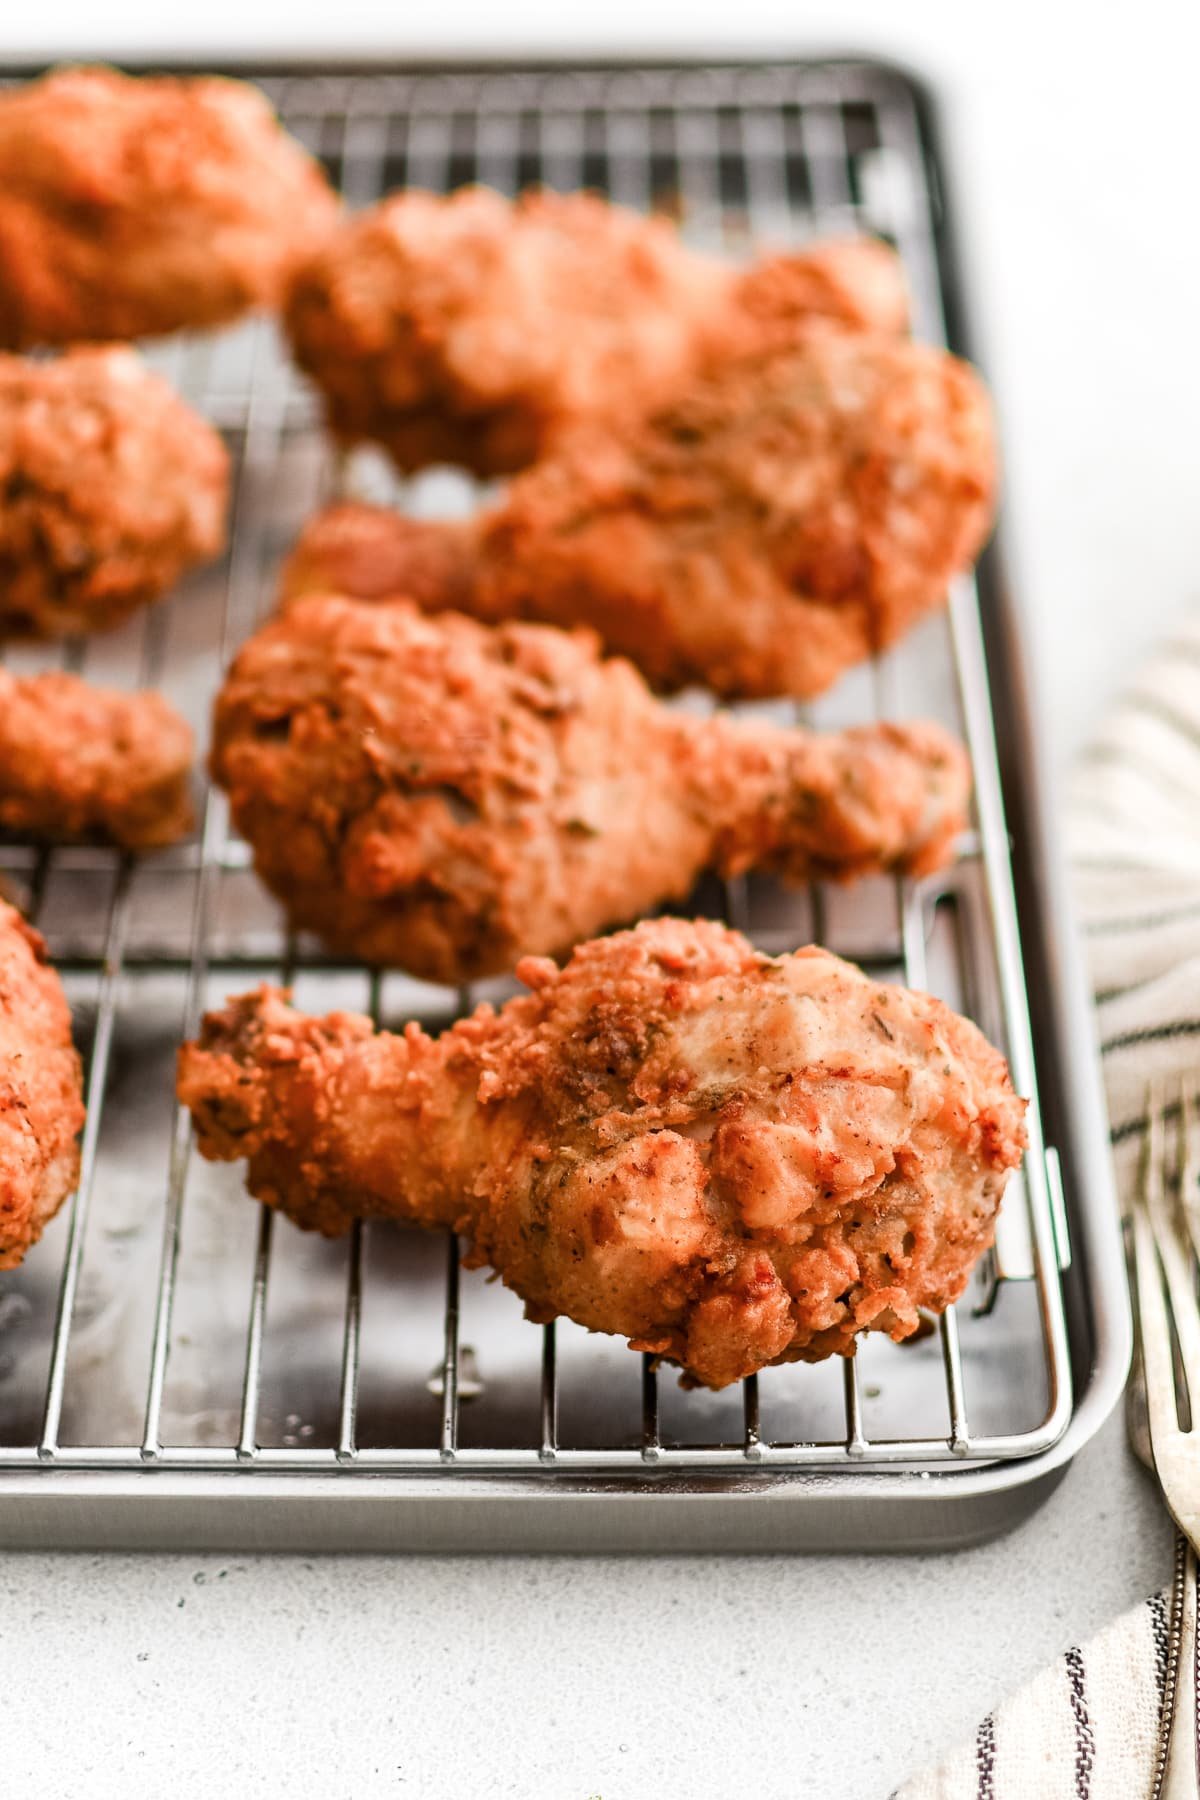
Table of Contents
When I think of classic Southern comfort food, I think of buttermilk fried chicken. This recipe involves marinating chicken (in this case, drumsticks) in seasoned buttermilk for at least 2-4 hours. The chicken is then dredged in seasoned flour and fried until perfectly crispy and juicy on the inside.
Although this is not a recipe I would consider “quick,” it is easy enough that anyone can make it and it’s well worth the effort. Serve it with Southern side dishes like Buttermilk Biscuits, sweet Candied Yams, or Sweet Cornbread for a complete meal.
How to Make the Best Buttermilk Fried Chicken
Here’s a rundown of my top tips for the perfect buttermilk fried chicken:
- Top tip: Use a digital meat thermometer or candy thermometer with a pot clip to monitor the temperature of the cooking oil and accurately test the chicken for doneness.
- Marinate in buttermilk. The natural lactic acid in buttermilk gently breaks down the meat’s proteins, resulting in a more tender texture without making the chicken mushy. That same acidity also helps the seasoned flour cling to the surface, giving you a crispier, more even golden crust. And because buttermilk helps chicken retain moisture, it stays succulent on the inside even after deep-frying.
- Add a bit of cornstarch or baking powder to the breading. Cornstarch draws out moisture from the chicken, helping the breading stay crispy longer. It also absorbs less oil, preventing an overly greasy coating. Finally, cornstarch has less gluten, resulting in a lighter, crunchier, more fabulous crust.
- Season every layer. This includes the buttermilk marinade, the flour coating, and a sprinkle of salt immediately after frying.
- Test fry 1-2 pieces of chicken to get an idea of how things are working. This gives you a chance to troubleshoot and make adjustments before fully committing. Remember, if the oil is too cold, the chicken will be greasy, and the coating may not stick; if the oil is too hot, the outside will burn before the inside can thoroughly cook.
New to frying? Be sure to check out my post on Deep Frying 101: How to Successfully Deep Fry Anything for helpful tips, techniques, and safety tips.
Key Ingredients
For the full printable recipe with measurements head to the recipe card at the bottom of this page.
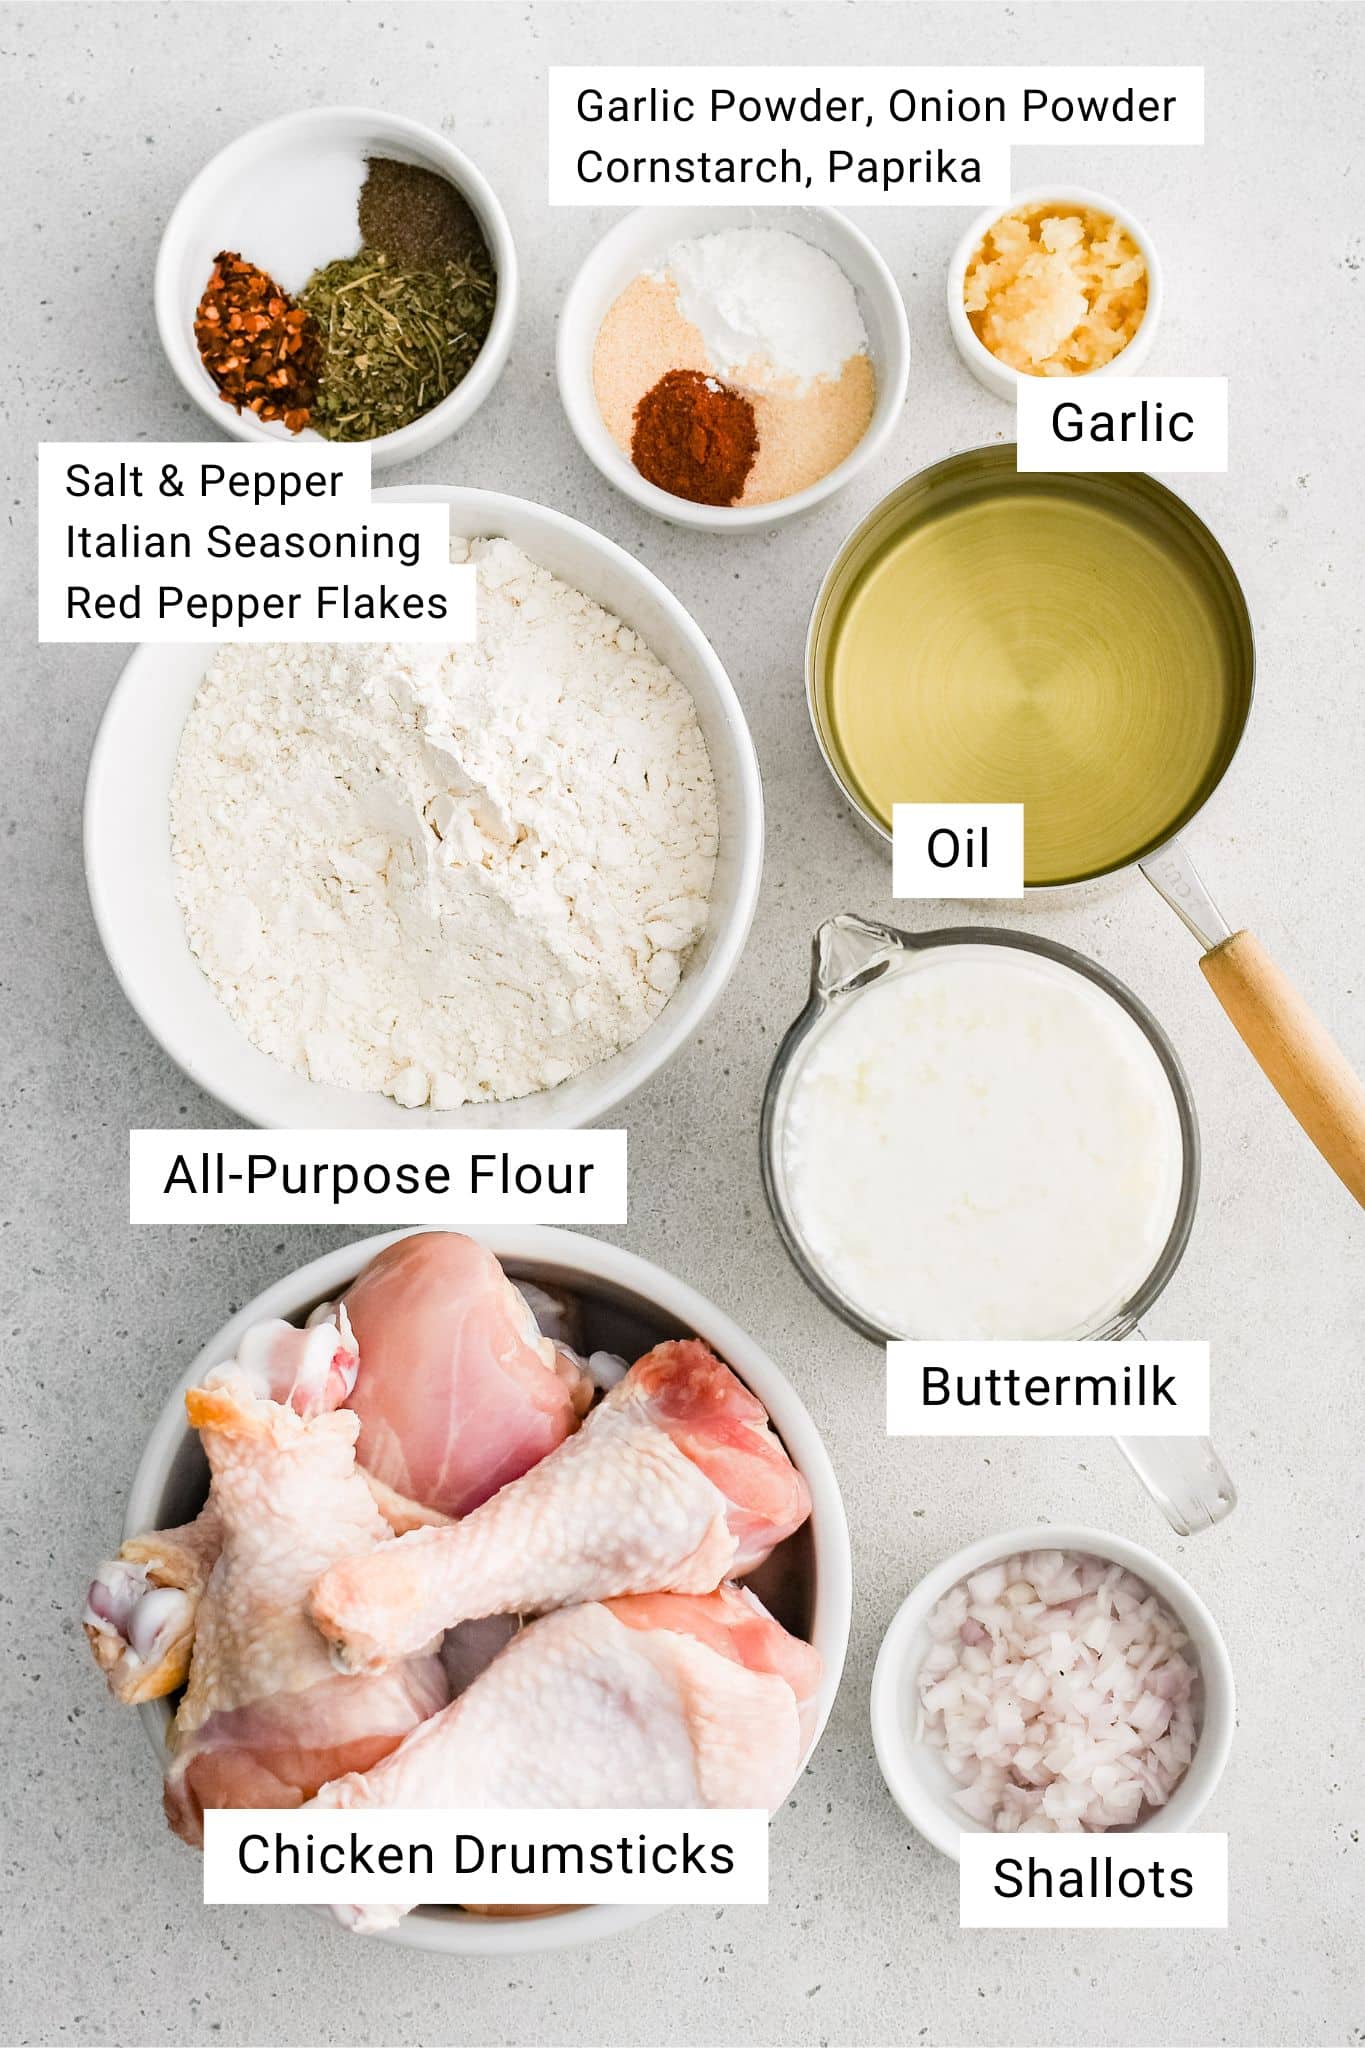
- Chicken: You can use any cut of chicken; however, the best type for frying is dark meat with the skin on. Breading sticks better when the skin is left on the chicken. I find that drumsticks and bone-in skin-on chicken thighs are best.
- Buttermilk Marinade: The chicken is marinated in a seasoned buttermilk mixture consisting of buttermilk, minced garlic, shallots, Italian seasoning, salt, pepper, and red pepper flakes. This is the first layer of flavor.
- Breading Mixture: After it’s marinated, it gets coated in a flavorful flour mixture consisting of all-purpose flour, cornstarch, garlic powder, onion powder, and paprika. This is the second layer of flavor. The cornstarch helps create a crispy, light, and crunchy coating (read more about cornstarch below).
- Frying oil: The chicken is then fried in oil with a high smoke point (425°F or above). I recommend using canola, peanut, or regular vegetable oil.
Dietary Substitutions
- To make this recipe gluten-free, use a gluten-free all-purpose 1:1 substitute for wheat flour. This King Arthur Gluten-Free Flour is a great example.
- To make this recipe dairy-free, you’ll need your favorite plant-based milk alternative (soy, almond, coconut, or oat) and an acid (white vinegar, apple cider vinegar, or lemon juice). Stir 1 tablespoon of the acid into 1 cup of plant-based milk and let it sit for 5-10 minutes until it thickens. Use immediately.
How Do I Prevent the Breading From Falling Off?
Here are my top tips to ensure your crust stays crispy and in place:
- Pat the chicken dry. Moisture is the enemy of fried chicken, so it’s pretty important to remove as much of it as possible before marinating.
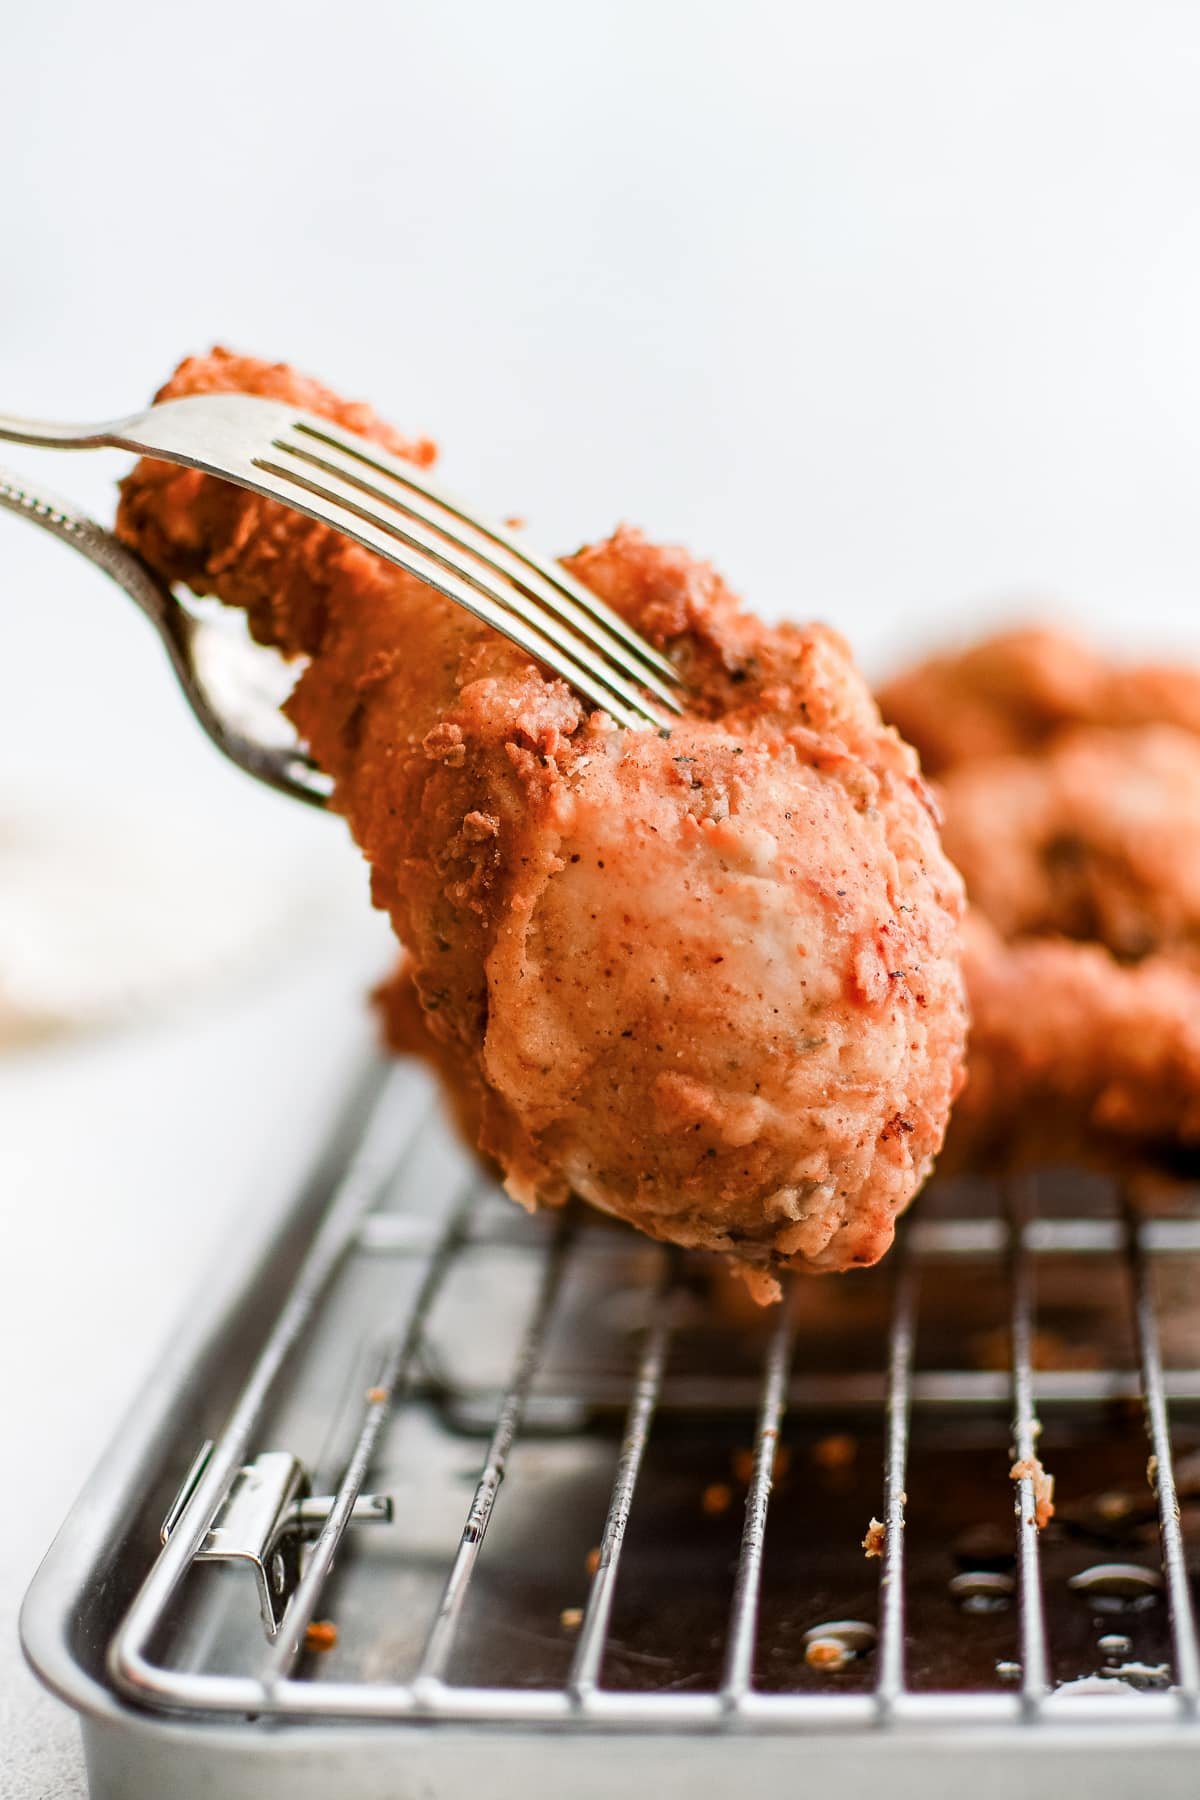
- Let the coating set. After breading, let the chicken rest on a wire rack for at least 10-15 minutes before frying. This helps the coating set and prevents it from sliding off when it hits the oil.
- Check the temperature of your oil. The ideal temperature for frying is about 340-360°F. If the oil is too hot, the outside will burn before the inside cooks; if the oil is too cold, the breading will absorb oil and fall apart.
- Drain on a wire rack (not on paper towels). I mean, think about it. Resting on a wire rack lets the chicken breathe, whereas paper towels smother the chicken, creating steam and making soggy bottoms.
- Fry the chicken in small batches. Overcrowding will lower the temperature too quickly, making the coating more likely to fall off.
Serving Ideas
This buttermilk fried chicken is a Southern classic that pairs perfectly with a variety of comforting sides and bold dipping sauces.
Whenever I make this recipe, I typically serve it alongside creamy mashed potatoes, collard greens, buttery cornbread, or baked mac and cheese. If you prefer something lighter, crisp coleslaw or a simple garden salad are great options and simple to make. And if you like dipping your fried chicken, you can’t go wrong with honey mustard, ranch dressing, and barbecue sauce, while spicier options like mumbo sauce or buffalo sauce add a bold kick.
You may also want to check out my roundup of 25+ Best Southern Comfort Food Recipes and 40+ Best Dutch Oven Recipes for even more delicious ideas.
How to Freeze Fried Chicken
To freeze before frying, marinate and bread the chicken as directed, then arrange the coated pieces in a single layer on a parchment-lined baking sheet. Flash freeze them for 1–2 hours, or until the coating is firm, then transfer the frozen pieces to a sealed container or freezer-safe bag and freeze for up to 3 months. When ready to cook, fry directly from frozen at 350°F (175°C) for 18–20 minutes, or until golden and the internal temperature reaches 165°F.
To freeze after frying, allow the cooked chicken to cool completely on a wire rack to keep the coating crisp. Wrap each piece individually in foil, then place the wrapped pieces into a freezer-safe container or bag and freeze for up to 3 months. For best results when reheating, bake at 375°F (190°C) on a wire rack for 20–25 minutes, or reheat in an air fryer at 350°F (175°C) for 5–7 minutes.
Frequently Asked Questions
I don’t recommend cooking breaded buttermilk chicken in the oven. However, you can bake buttermilk-marinated chicken pieces with fantastic results. To do so, marinate the chicken in the buttermilk marinade overnight. When ready to cook, preheat the oven to 400°F and line a large baking sheet with foil sprayed with non-stick cooking spray. Bake until the internal temperature registers 165°F, as measured with a digital meat thermometer. Drumsticks will take approximately 35-45 minutes.
Yes. Spray the breaded chicken (drumsticks) with oil, then transfer them to an air fryer preheated to 370°F. Do not overcrowd the basket. Cook for 25-30 minutes or until the internal temperature reaches 165°F (75°C). Flip halfway through cooking.
The easiest way to get flavorful fried buttermilk chicken is to season the buttermilk marinade and the flour coating. If you’re doing that already, add a little hot sauce, garlic powder, onion powder, or additional salt to the marinade. For the flour coating, mix in a couple of teaspoons of Cajun seasoning or dry Ranch seasoning.
More Crispy Chicken Recipes


If you try this buttermilk fried chicken recipe, I’d love to hear what you think, so be sure to leave a comment and let me know how it turned out! Thank you so much! 💛

Buttermilk Fried Chicken Recipe
Ingredients
For the Buttermilk Marinade
- 3 pounds chicken drumsticks, or thighs, wings, breasts (bone-in, skin-on)
- 2 cups buttermilk
- 6 cloves garlic, minced, or 1½ teaspoon garlic powder
- 2 large shallots, minced
- 1 tablespoon Italian seasoning
- 2 teaspoon salt
- 1 teaspoon freshly ground black pepper
- 1 teaspoon red pepper flakes, or 1 tablespoon hot sauce
For Frying the Chicken
- 2 cups all-purpose flour
- ½ cup cornstarch
- 2 teaspoon garlic powder
- 2 teaspoon onion powder
- 2 teaspoon paprika
- 2 teaspoon salt
- 1 teaspoon freshly ground black pepper
- 2 tablespoon leftover buttermilk marinade, Optional, please see note
- vegetable oil, for frying, i.e., canola oil, peanut oil, etc.
Instructions
- Dry the chicken: Remove the chicken pieces from the refrigerator and pat them dry with paper towels. Set aside.
- Prepare the buttermilk marinade: Combine the ingredients for the buttermilk marinade in a large mixing bowl. This includes the buttermilk, garlic, shallots, Italian seasoning, salt, pepper, and red pepper flakes.

- Marinate the chicken: Place the chicken pieces in the marinade, making sure they are fully submerged. Marinate for at least two hours to overnight.
- Prepare the flour mixture: Whisk together the flour, cornstarch, garlic powder, onion powder, paprika, salt, and black pepper in a shallow dish until evenly combined. Optional: Add 2-3 tablespoons of the buttermilk marinade to the flour mixture and work it into the flour with your fingertips. This will give your breading a craggy texture and extra crunch.
- Set up a wire cooling rack over a large baking sheet.
- Dredge the chicken: Remove the chicken from the marinade and let the excess liquid drip off. Place one piece of chicken in the flour mixture and toss to coat. Add 2-3 more chicken pieces to the bowl, one at a time, tossing between each addition. Toss the chicken until the pieces are thoroughly coated, then gently shake off any excess. Place the breaded chicken on the wire cooling rack to rest. Coat the remaining chicken in the flour and set aside.
- Rest for 10-15 minutes: Allow the coated chicken to rest on the wire rack for 10-15 minutes. You may notice the buttermilk soaking through the flour coating during this time.Optional: Dredge the chicken in the flour mixture again, pressing gently to ensure the coating sticks.
- Prepare the oil for frying: Heat approximately 3 inches of vegetable oil in a large Dutch oven or cast-iron skillet set over medium/medium-high heat. Heat the oil until it is between 340-360°F. To test if the oil is hot enough, add a small amount of flour to the oil. If it sizzles, it’s ready. Or, for a more accurate reading, use a digital thermometer. This is a great multi-purpose digital meat thermometer (and what I use personally), or you can use a candy thermometer with a pot clip so it stays in place the whole time you’re frying.
- Fry the chicken: Carefully add 3 (maybe 4) chicken pieces to the hot oil. Do not overcrowd the pot. Depending on size, thighs and drumsticks take approximately 12-15 minutes to cook. Check for doneness with a digital meat thermometer. They should be cooked to at least 165°F (75°C) at the thickest part, but they are juiciest at 175-185°F (80-85°C).
- Rest and repeat: Use kitchen tongs to remove the chicken from the hot oil and place them on a clean wire rack set over a large baking sheet. Sprinkle the tops with salt if desired. Allow the oil to return to temperature, and repeat with the remaining chicken. Let the chicken cool for about 10 minutes before serving.


Notes
- Use a digital meat thermometer or candy thermometer with a pot clip to monitor the temperature of the cooking oil and accurately test the chicken for doneness.
- Monitor the temperature of your oil. The ideal temperature for frying is about 340-360°F. If the oil is too hot, the outside will burn before the inside cooks; if the oil is too cold, the breading will absorb oil and fall apart.
- Drain on a wire rack (not on paper towels). Resting on a wire rack lets the chicken breathe, whereas paper towels smother the chicken, creating steam and a soggy crust.
- To make this recipe gluten-free, use a gluten-free all-purpose flour that is a 1:1 substitute for wheat flour. This King Arthur Gluten-Free Flour is a great example.
- To make this recipe dairy-free, you’ll need your favorite plant-based milk alternative (soy, almond, coconut, or oat) and an acid (white vinegar, apple cider vinegar, or lemon juice). Stir 1 tablespoon of the acid into 1 cup of plant-based milk and let it sit for 5-10 minutes until it thickens. Use immediately.
Nutrition
Nutrition information is automatically calculated, so should only be used as an approximation.


can I use the buttermilk chicken recipe on boneless skinless breasts… will it stick to chicken?
Hi Marsha! Yes, you can use boneless skinless chicken breasts; however, bone in, skin on is better for this recipe. The coating should still stick, but I recommend patting the chicken dry after marinating, then pressing the flour mixture firmly onto each piece. Since breasts cook faster and can dry out more easily, pound them to an even thickness and cook just until they reach 165°F in the thickest part. 🙂
I’m a 77+ yr old man, who normally doesn’t cook but habitually read and print out favorite recipes….which drives my wife Crazy. I don’t eat very much but I know ‘what I like and would like’, if I had it in front of me. With great effort on my behalf, I shopped for the ingredients for your “Buttermilk Fried Chicken’ recipe. I followed your every direction. I purchased a package of fresh chicken 12 drumstips; preparing all up to frying. Ten are in the freezer on parchment and subsequent packaging, of another day. I made the two largest ones in my Induction Wok with a quart of Canola oil – 360F. 15 min. FABULOUS! You & I did it! (Of course, my wife will not eat anything fried or anything I make, which is very unfortunate and saddens me we can no longer share such a vital part of living together.) I’m very pleased with and enjoy receiving/reading your recipes. I don’t think I discovered you until quite recently. Continued success! You are a great COOK! ***** Thank you, RON
Thank you so much for your kind message, Ron. I’m so glad you enjoyed the Buttermilk Fried Chicken and that the recipe worked well for you. It means a lot to know you enjoy reading my recipes. Wishing you all the best and happy cooking!