This post may contain affiliate links. See my disclosure policy.
This fun and delicious Homemade Fruit Roll Ups Recipe is so easy to make at home. Made with just 3 simple ingredients, they’re the perfect anytime snack and so much better than store-bought fruit roll ups.
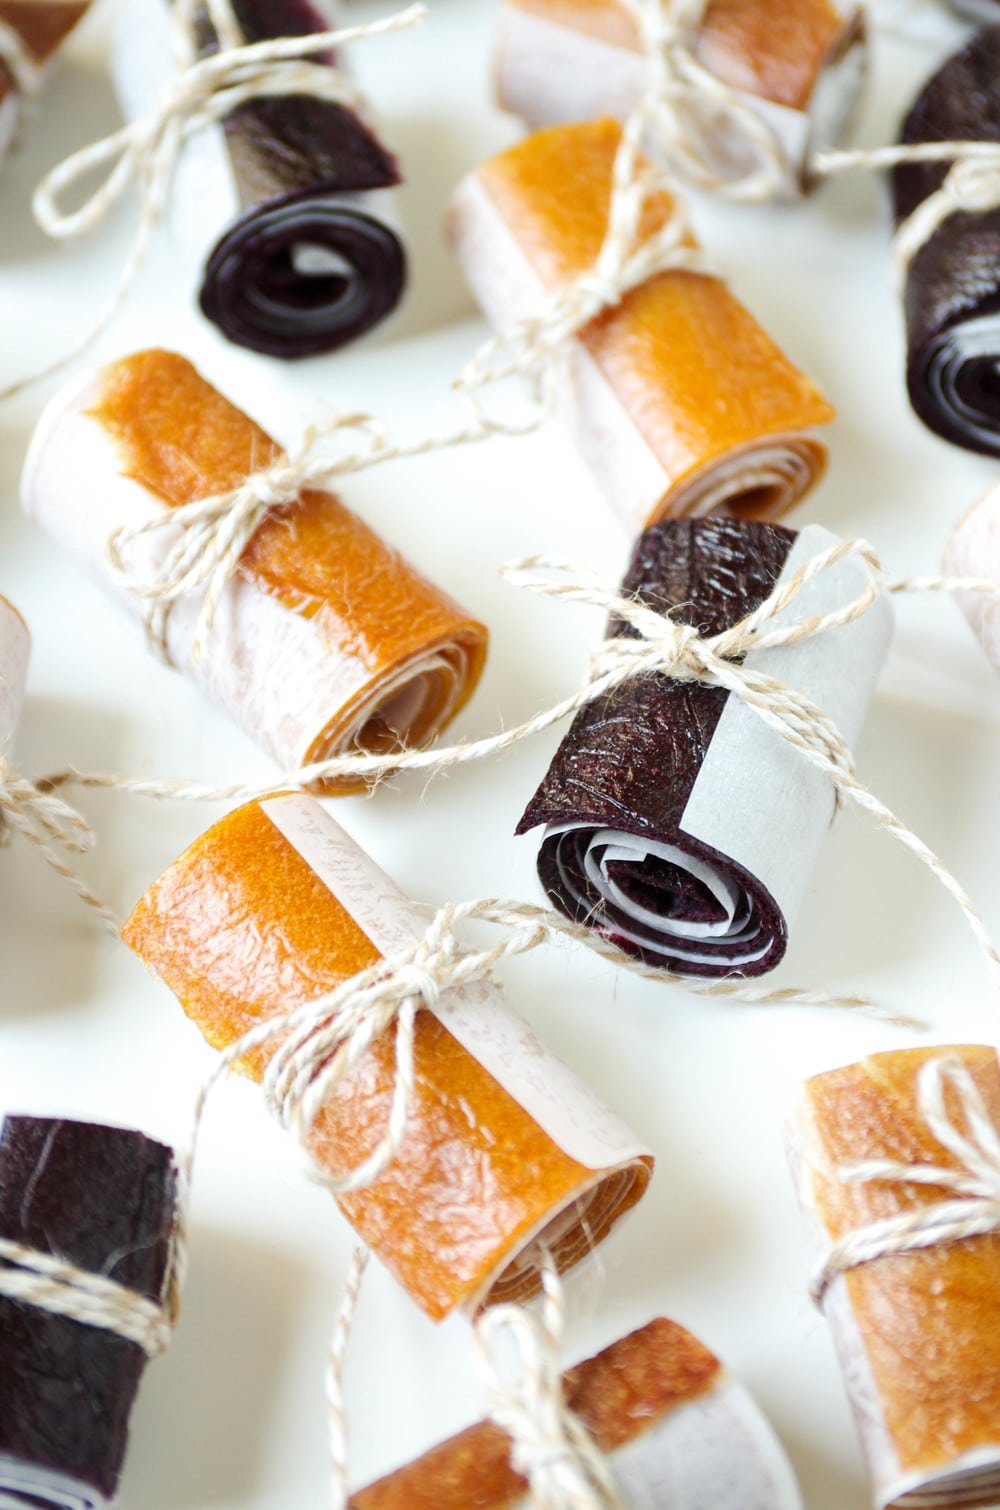
Made with real fruit, these homemade fruit roll ups are one of my family’s favorite healthy snacks. It’s easy to mix and match different fruity flavors using whatever fresh fruit is in season or your favorite frozen fruit.
Safe for school lunches, they’re gluten-free, dairy-free, nut-free, soy-free, corn-free, egg-free, and can easily be made vegan-friendly. They’re also free from preservatives, food coloring, and artificial flavors.
Table of Contents
Ingredients
- Fruit: You can use almost any fruit to make fruit roll ups, including berries, kiwi, papaya, peaches, mango, or acai. Fruits I avoid are those that brown, such as bananas, pears, or apples.
- Sweetener: Honey, maple syrup, or agave are all really great sweeteners. Granulated sugar or brown sugar is not recommended, as it will not dissolve properly with the fruit.
- Fresh lemon juice: Helps to preserve the fruit roll ups and accentuates the flavors.

How to Make Homemade Fruit Roll Ups
Start by preheating the oven to its lowest possible temperature setting (mine was 170 degrees F). Line two or three 12×18-inch jelly roll pans with parchment paper, high-quality plastic wrap, or silicone baking mats (if you have or can get them, silicone mats are definitely the easiest to work with).
Add the fruit, honey, and lemon juice to a blender or food processor and process until smooth. If you (or your kids) prefer your roll ups with no seeds, strain the liquid through a mesh strainer and discard the solids.
Next, divide the fruit mixture between your baking sheets, using an offset spatula to form a single thin, even layer. (It might help to tap the side of the pan against the counter.)
Bake your fruit roll-up sheets for 4-6 hours, checking on them periodically and rotating the pan every hour or two if possible (to keep the cooking even).
When the purée is dry to the touch and pliable, it’s done cooking (the edges may dry sooner than the center).
Remove from the oven, peel off the parchment/plastic wrap/mat, and gently transfer the entire sheet to a cutting board. Slice it into your desired sizes. Roll each roll-up with parchment paper or wax paper and tie with a string if desired.

How to Serve
These fruit roll ups can be enjoyed immediately, and you can toss leftovers in lunchboxes for up to a week. They make the perfect healthy sweet snack. You can even try them as an on-the-go breakfast companion!
Storage and Freezing
These roll ups should last in an airtight container in the fridge for up to one week. You can also freeze them to make a hardened version of fruit roll ups (like an ice pop or “fruit chips”).

More Fruity Treats:
If you try making this Fruit Roll Ups Recipe, please leave me a comment and let me know! I always love to hear your thoughts.

Homemade Fruit Roll Ups Recipe
Ingredients
- 4 cups fruit, mixed berry/strawberry/mango, chopped
- 1.5 tablespoon honey, optional
- 2 teaspoon fresh lemon juice
Instructions
- Preheat oven to lowest temperature, 170 degrees F (that was the lowest setting on my oven). Line 2 or 3 12×18 inch jelly roll pans with parchment paper, good-quality plastic wrap or silicon baking mats (I have tried all 3, the baking mats are BY FAR the easiest to prep and peel).
- Combine ingredients in a blender or food processor and process until smooth. If desired, strain liquid through a mesh strainer into a clean bowl (this is not necessary, but if you or your kiddos prefer your fruit roll ups without seeds, this step is recommended). Discard solids.
- Divide mixture between your prepared baking sheets, using an offset spatula to create a very thin, equal layer. I found that tapping the side of the pan against the counter helped in equally spreading the pureed fruit.
- Bake for 4-6 hours, checking periodically. Rotate pan every 1-2 hours for more even cooking. Your fruit roll ups are done when the puree is dry to the touch and pliable (note: the exterior part of the fruit roll ups may dry sooner than the middle).
- When finished baking, remove from oven, peel off parchment or mat and gently transfer to a cutting boards. Slice into desired sized, roll with parchment paper or wax paper and store in an air-tight container for up to one week.
Nutrition
Nutrition information is automatically calculated, so should only be used as an approximation.


Great recipe. I have found mixing a little apple with many fruits such as blueberries creates a roll up with better texture, taste, and they are easier to handle. I stay away from the others
Thanks for the great feedback and tip, Ryan 🙂