This post may contain affiliate links. See my disclosure policy.

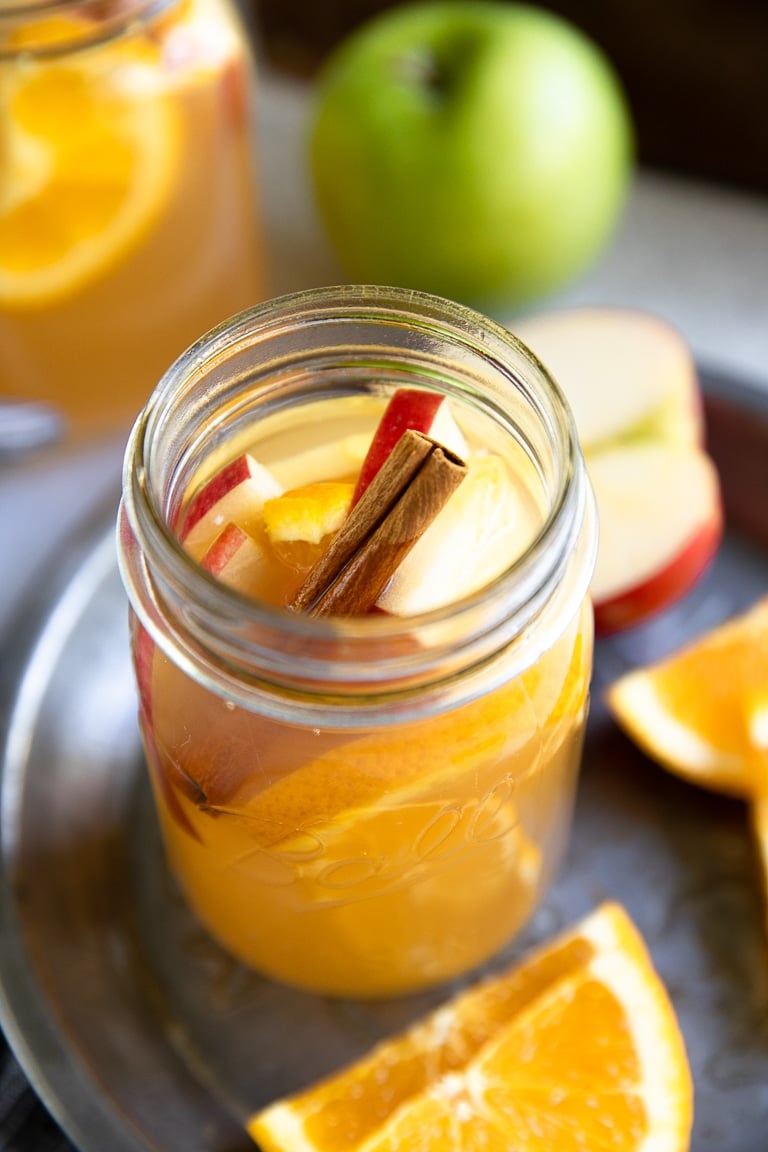
Apple Cider is a fragrant and delicious spiced apple drink made from apples, oranges, spices, water, and optional sweetener. Learn how to make this super-easy Homemade Apple Cider Recipe in the slow cooker or on the stovetop and enjoy all winter long.

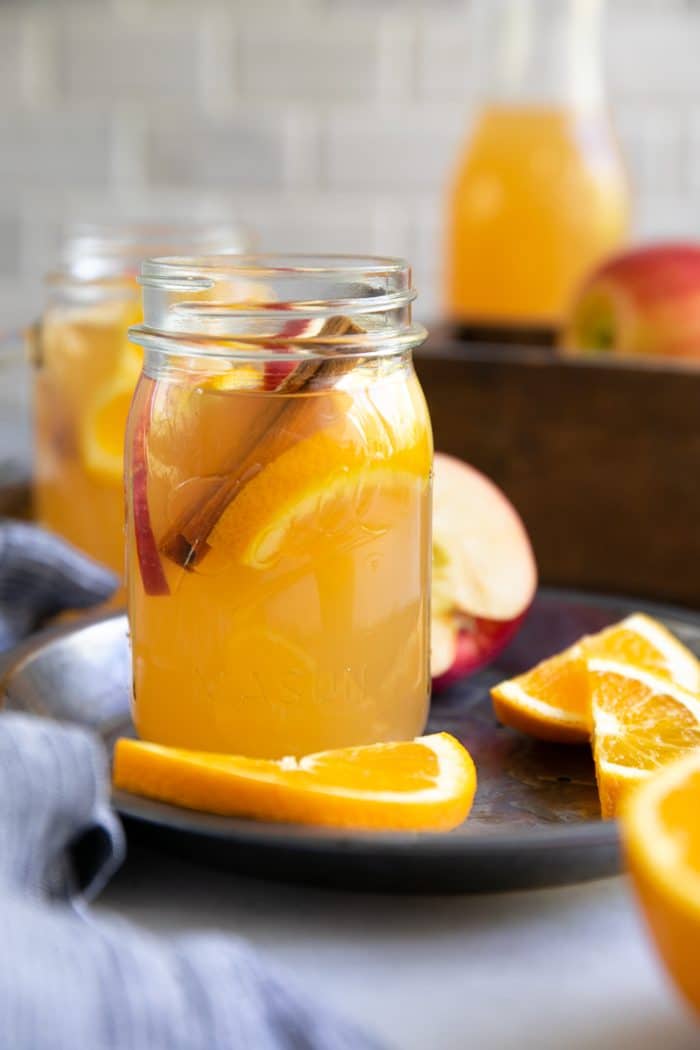
Today I’m sharing how to make my favorite warm and toasty homemade apple cider recipe. You can enjoy this recipe served warm or cold, and even with a splash of bourbon.
Making your own apple cider is probably a lot easier than you think, but it does take a little time. If you’re in a hurry, it’s best to plan ahead before making this recipe. Fortunately, you only need a handful of simple ingredients (like apples!), some citrus, optional spices (like nutmeg, cinnamon, whole allspice), and water. Added sweetener is optional, so feel free to make your cider as sweet (or unsweet) as you’d like.
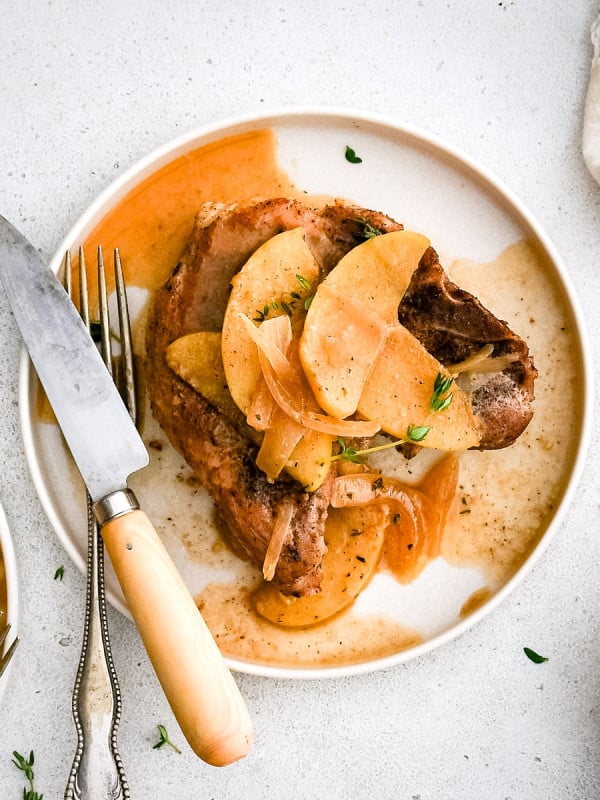
And, after you’ve made a big batch of this beautiful cider, don’t forget to use it to make this slow cooker apple cider pulled pork!
Table of Contents
What is Apple Cider?
As it turns out, the labeling (and therefore definition) of apple cider is somewhat confusing. Different states have different labeling protocols and depending on where you live, your cider may be pasteurized or unpasteurized. In general, most apple cider (unlike apple juice) is unfiltered.
Travel outside of the United States, and apple cider means something entirely different. What Americans refer to as hard cider or hard apple cider, is simply apple cider in other countries. In these cases, it is a fermented alcoholic beverage, not a juice.
This homemade apple cider is naturally vegan and alcohol-free by default, but it can be adapted.
Ingredients
This recipe makes approximately 16 cups. Fortunately, you can make as much (or as little) as you would like. You’ll need:
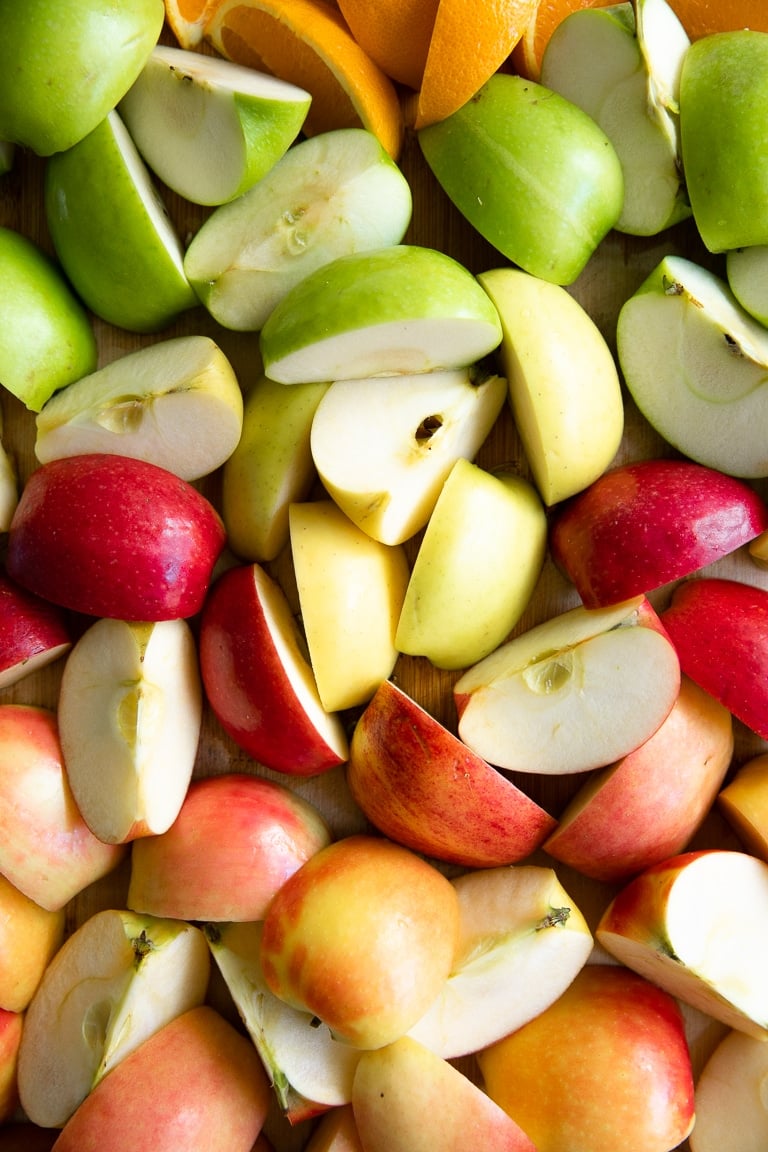
- Apples – Fresh apples are an absolute must. I like to go to the market to pick out a variety of different apples of all different colors. Feel free to use just one type or a variety. I discuss the different apple varieties, flavors and combinations in the section “Choosing Apples for Apple Cider” located after the recipe card.
- Oranges – Oranges add a nice citrus flavor characteristic to apple cider. Add an extra orange slice or two with each warm cup of cider for a little extra sweetness.
- Spices – Spices add an extra depth of flavor and complexity setting it apart from simple apple juice. I like to add whole cinnamon sticks, cloves, and allspice berries. Feel free to leave out the spices if you prefer.
- Sweetener – Adding sweetener is completely optional. I like to add a touch of sugar, but not so much that I can no longer taste the fresh apple flavor or warming spices. My favorite sweetener is brown sugar, but feel free to add maple syrup, agave, granulated sugar, or honey.
- Water – The cider base.
How to Make Apple Cider
To make this homemade apple cider recipe, you will need a large stockpot (or slow cooker), potato masher, and a fine-mesh strainer or cheesecloth.
For the full printable recipe, jump to the recipe card below.

- Add the chopped apples, orange slices, and whole spices to a large stockpot. Pour in enough water to fully cover the fruit (about 10–12 cups); bring the mixture to a boil over high heat. Once boiling, reduce the heat to low and simmer partially covered for 1 to 2 hours, or until the apples are very soft and falling apart.

- Use a potato masher to mash the softened apples, oranges, and spices directly in the pot. Continue simmering over low heat for another 1 to 2 hours to deepen the flavor. Remove the pot from heat and let the cider cool slightly.

- Carefully strain the mixture through a fine-mesh strainer or cheesecloth into a clean bowl or container, pressing to extract as much liquid as possible.

- Taste the cider and stir in sweetener (such as maple syrup, brown sugar, or honey) to taste, if desired.
Jessica’s Recipe Tips
Use these expert tips to enhance flavor, improve clarity, and repurpose leftovers.
- Repurpose the solids: After straining, save the leftover fruit mash. Use it in smoothies, Instant Pot oatmeal, applesauce, fruit roll-ups, or compost it.
- Leave the peels on: Do not peel the apples. The skins enhance flavor, color, and nutritional value.
- Strain twice for clearer cider: For a smoother cider, strain the liquid a second time using a fine-mesh strainer lined with cheesecloth or a coffee filter.
- Adjust for thicker cider: For a more concentrated cider, reduce the water by 2–4 cups before cooking or simmer the strained cider uncovered for 15–20 minutes to thicken.
Choosing Apples for Apple Cider
This recipe uses a blend of sweet and tart apples to create a balanced and flavorful cider. Use the list below to guide:
Sweet Apples (for natural sweetness and body): Use more of these if you prefer a sweeter cider without added sugar.
- Gala: Mild, honey-sweet flavor
- Fuji: Very sweet and juicy
- Red Delicious: Mild, sweet, lower complexity
- Golden Delicious: Buttery, mellow sweetness
- Cortland:Sweet and aromatic with low acidity
Tart/Acidic Apples (for brightness and complexity): Add tart apples to balance sweetness and enhance flavor depth.
- Jonathan: Tart with subtle spice
- Braeburn: Balanced sweet-tart with spicy undertones
- Pink Lady: Crisp and tangy
- Honeycrisp: Juicy, clean sweet-tart flavor
- Granny Smith: Sharp, acidic, very tart
- McIntosh: Soft, tangy, aromatic
Recommended Blends: Use approximately 60% sweet apples and 40% tart apples for a balanced hot apple cider. Adjust the ratio based on your taste preferences:
- Sweeter: Use more Fuji, Gala, or Golden Delicious
- Tarter: Use more Granny Smith, Pink Lady, or Jonathan
- Balanced: Combine Gala, Honeycrisp, and Braeburn
Variations
Here are a few easy and delicious variations:
- Add alcohol: Add this apple cider to sangria or other mixed cocktails. Add a splash to your next glass of champagne for brunch or add a little bourbon for a warm pre-dinner apéritif.
- Chai-tea: Chai tea makes a great alternative to whole spices like cinnamon or cloves. Steep 1-2 tea bags (or more), to taste.
- Add some cranberries: Apples and cranberries are hallmarks of Autumn. Add some cranberries and adjust the sweetness to taste.
- Add some vanilla: You don’t need a lot of vanilla. Just a teaspoon or so.
How to Store Leftover Apple Cider
This recipe makes a lot. Drink it, cook with it, or save it for later!
- Refrigerator: Transfer cooled cider to glass jars with fitted lids. Transfer to the refrigerator and use within 5 days.
- Freezer: Transfer cooled cider to glass jars with fitted lids. Fill approximately 3/4 of the way, leaving enough room for expansion when frozen. Store in the freezer for up to 3 months, thawing in the refrigerator. Warm, gently, on the stovetop, if desired.
More Apple Recipes


If you make this apple cider recipe, I’d love to hear how it turned out in the comment section below! Your review will help other readers in the community. And if you’re hungry for more delicious food inspiration and exclusive content, join my free newsletter here.
Homemade Apple Cider Recipe
Ingredients
- 10 apples,
assorted varieties, quartered
- 2 oranges, quartered
- 5 cinnamon sticks
- 2 teaspoon whole cloves
- 1 teaspoon allspice berries
- 16 cups water
- ¼ cup sweetener ,
(optional) – maple syrup, granulated sugar, brown sugar, etc.
Instructions
Stovetop Method
- Prepare Ingredients. Prepare all ingredients and transfer to a large, oversized stockpot.
- Simmer. Cover and allow the pot to come to a low boil over high heat. Immediately reduce heat to low and maintain a simmer for approximately 1-2 hours, or until apples are completely soft and mushy. Stir occasionally.
- Mash. Remove pot from heat and use a potato masher to mash the apples and oranges, together with the spices, releasing their flavors into the liquid as they break apart.
- Simmer. Cover stockpot and return to a simmer over low heat. Continue to cook for an additional 1-2 hours.
- Strain. Remove from heat and allow apple cider to cool slightly before straining then use a fine-mesh strainer or cheesecloth to separate the solids (mushed up apples and oranges) from the liquid. When a backup of solids starts to collect, use a large wooden spoon to press the solids against the side of the strainer, releasing the final bit of their juices. Discard the solids.
- Sweeten, to taste. If desired, stir in additional sweetener.
- Serve. Serve warm as is or garnished with an orange slice and cinnamon stick. Enjoy!
Slow-Cooker Method
- Prepare and transfer ingredients to a 6-quart slow cooker. Prepare all ingredients and transfer the apples, oranges, and spices to the bowl of a large slow cooker. Cover with water, leaving approximately 1-inch of space at the top of the slow cooker.
- Simmer. Cover and cook on low for 6-8 hours or high for 3-4 hours, or until apples are completely soft and mushy. Stir occasionally.
- Mash. Use a potato masher to mash the apples and oranges, together with the spices, releasing their flavors into the liquid as they break apart.
- Strain. Allow apple cider to cool slightly before straining then use a fine-mesh strainer or cheesecloth to separate the solids (mushed up apples and oranges) from the liquid. When a backup of solids starts to collect, use a large wooden spoon to press the solids against the side of the strainer, releasing the final bit of their juices. Discard the solids.
- Sweeten, to taste. If desired, stir in additional sweetener.
- Serve. Serve warm as is or garnished with an orange slice and cinnamon stick.
Notes
- Given that the volume of the slow cooker is smaller than the stockpot, I recommend cutting the recipe amount in half.
- Leftovers will store in the refrigerator for up to 5 days or freezer for up to 3 months.
Nutrition
Nutrition information is automatically calculated, so should only be used as an approximation.


Can I process it in a water bath canner to preserve it for longer? ?
Yes, you can absolutely process homemade applesauce in a water bath canner to preserve it for longer! Just make sure your applesauce is hot when you transfer it to sterilized jars, leaving about 1/2 inch of headspace. Process the jars in a boiling water bath for 15-20 minutes (adjust for altitude if necessary), and then let them cool completely. This will help seal the jars and extend the shelf life of your applesauce for several months.
If you freeze this recipe, can you put it in freezer bags to save space?
Yes, you can definitely freeze apple cider in freezer bags to save space. Freezer bags are a great option because they can lay flat, making them easy to stack or store in tight spaces. Just be sure to leave some room at the top of each bag when filling, as the liquid will expand as it freezes. To use, simply thaw the cider in the refrigerator overnight before reheating. This method is convenient and helps preserve the taste and quality of the apple cider for several months.
Saved recipe! 🙂 I would suggest for freezing make at least one or two ice cube trays up (freezing the rest however), that way you can always drop a cube or two, or more, into any number if things to shake up the flavor! Lemonade? Apple cider cube! Tea? Apple cider cube! Coffee? Apple cider cube?? Bowl of hot soup? Apple cider cube! Gravy? Sauce? Apple cider cube it! 😀 Make all your food happy! Lol 🙂
Ps. Add a couple pineapple rings, a 6oz can of pineapple juice, and a small sliced hunk of ginger! 🙂 While your at it get crazy and add a couple slices turmeric and a few (pink? or not) peppercorns!
Pps. The screaming cranberries are scaring me… 👻🎃🍁
It was good but adding the oranges with the peels left on made it too bitter for us. It was hard to taste the apples because the bitterness kind of took over.
Do you need to peel the apples or can you leave them with the peel/skin on?
This recipe leaves the skin on 🙂
Are the oranges quartered peeled or quartered with peel
They don’t need to be peeled(I don’t), but peeling them would also work.
Can you serve it cold?
Absolutely 🙂
Leftovers will store in the refrigerator for up to 5 days or freezer for up to 3 months.
I made this tonight with a variety of apples and it’s delicious! Can’t wait to serve on Thanksgiving.
Thanks for the delicious feedback and rating D’Arcy 🙂
When I saw this recipe pop up, I already had apples on hand and had to try it. It turned out great!