This post may contain affiliate links. See my disclosure policy.

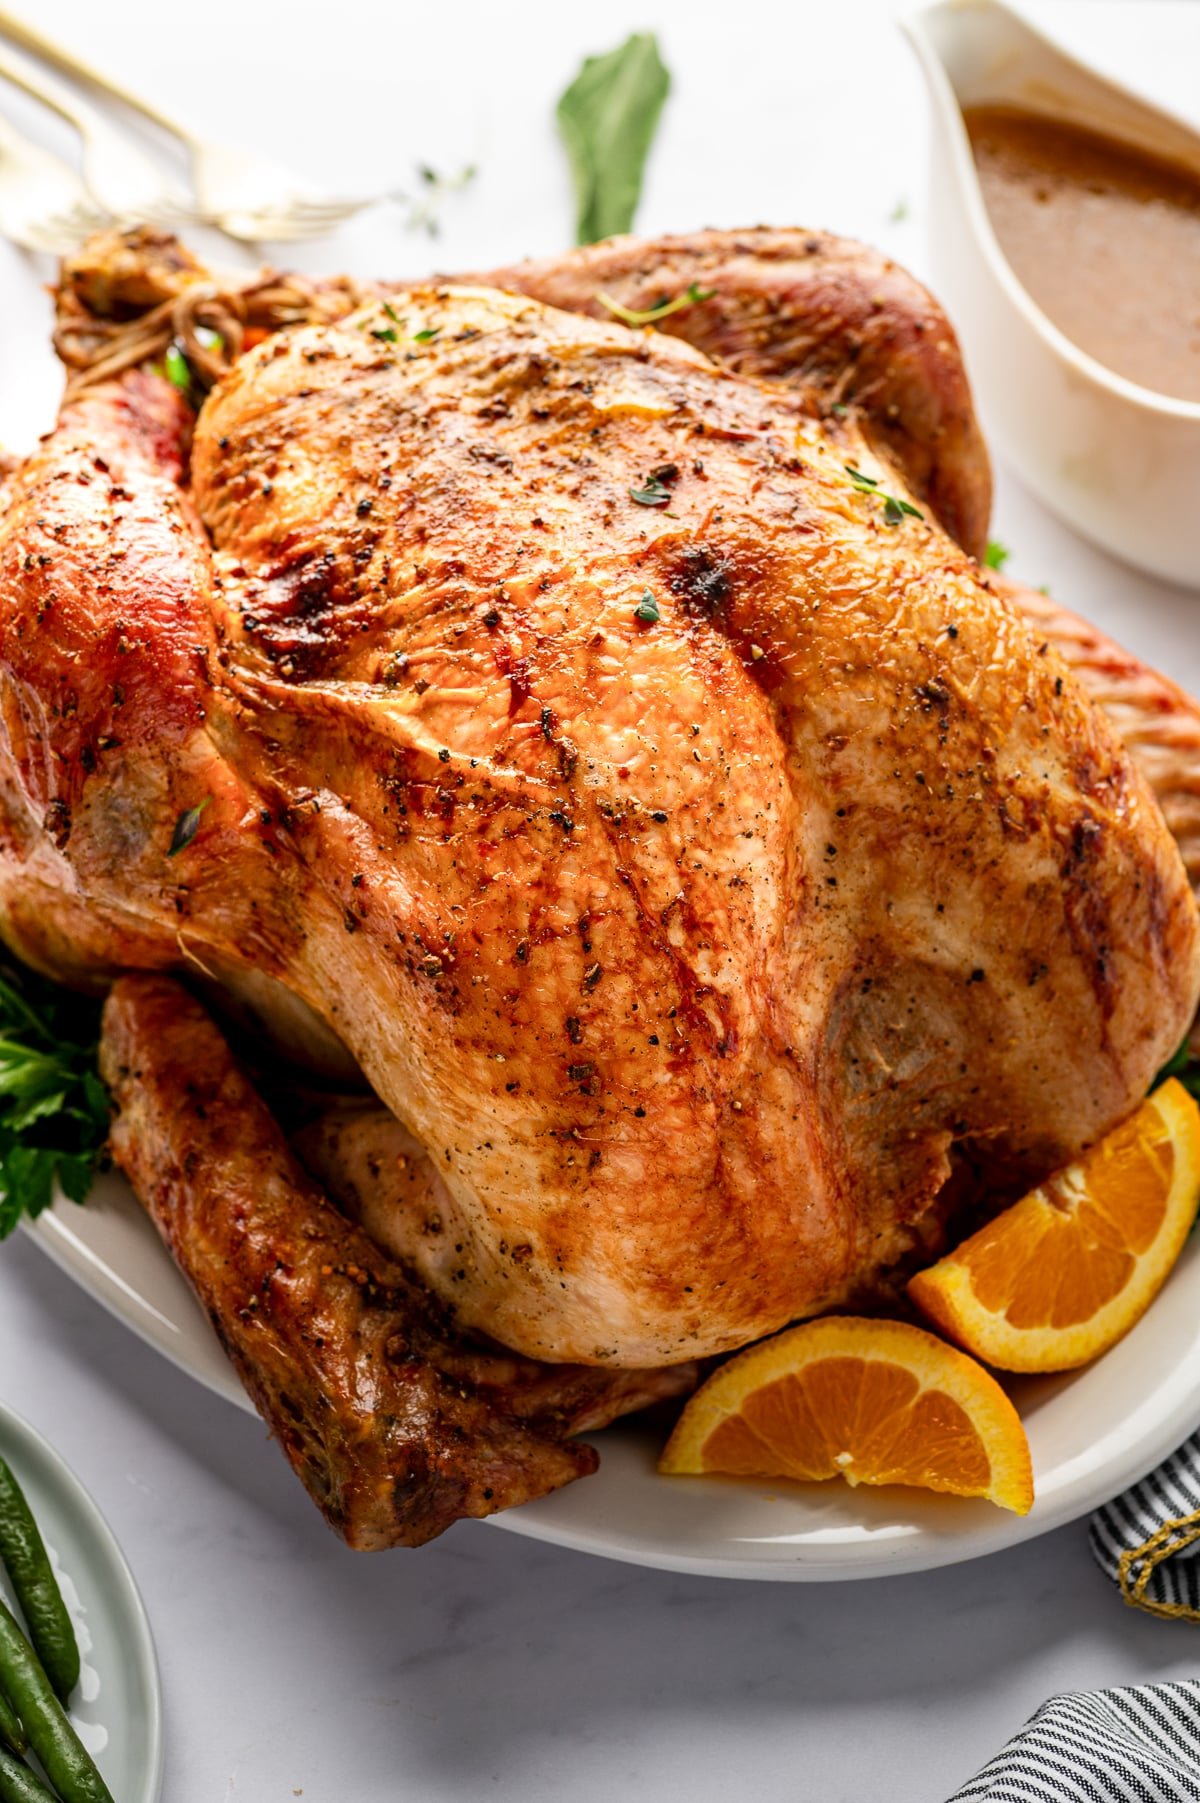
This foolproof Thanksgiving Turkey Recipe is coated in a flavorful herb butter for tender, juicy meat and golden, crispy skin. It’s the best oven-roasted turkey you will ever make – and the easiest.
This simple, stress-free recipe is perfect for beginners and experts alike. No brining or fancy equipment required.
If roasting a whole turkey feels overwhelming, I totally get it. I was nervous my first time too. The good news is that with the right method, it is much easier than you think.
In this post, I’m taking all the guesswork out of making the best ever Thanksgiving turkey by walking you through everything from thawing and prep, to roasting and serving. I’ll show you exactly how to make a perfectly juicy, golden-brown turkey using simple, familiar ingredients, and the same foolproof method I’ve used for years.
Table of Contents
- What you’ll Need
- Tools and Equipment
- Turkey Do’s and Don’ts
- What Size Turkey Do You Need
- Remember to Thaw the Turkey -Early!
- Make-Ahead Thanksgiving Turkey Timeline
- How Long to Cook A Turkey
- How to Cook a Turkey (Step-by-Step)
- Turkey Troubles? Here’s How to Fix It
- How to Store Leftover Turkey
- Frequently Asked Questions
- Best Thanksgiving Turkey Recipe
What you’ll Need
Besides the turkey, all you need is a handful of seasonings, herbs, aromatics, and butter.
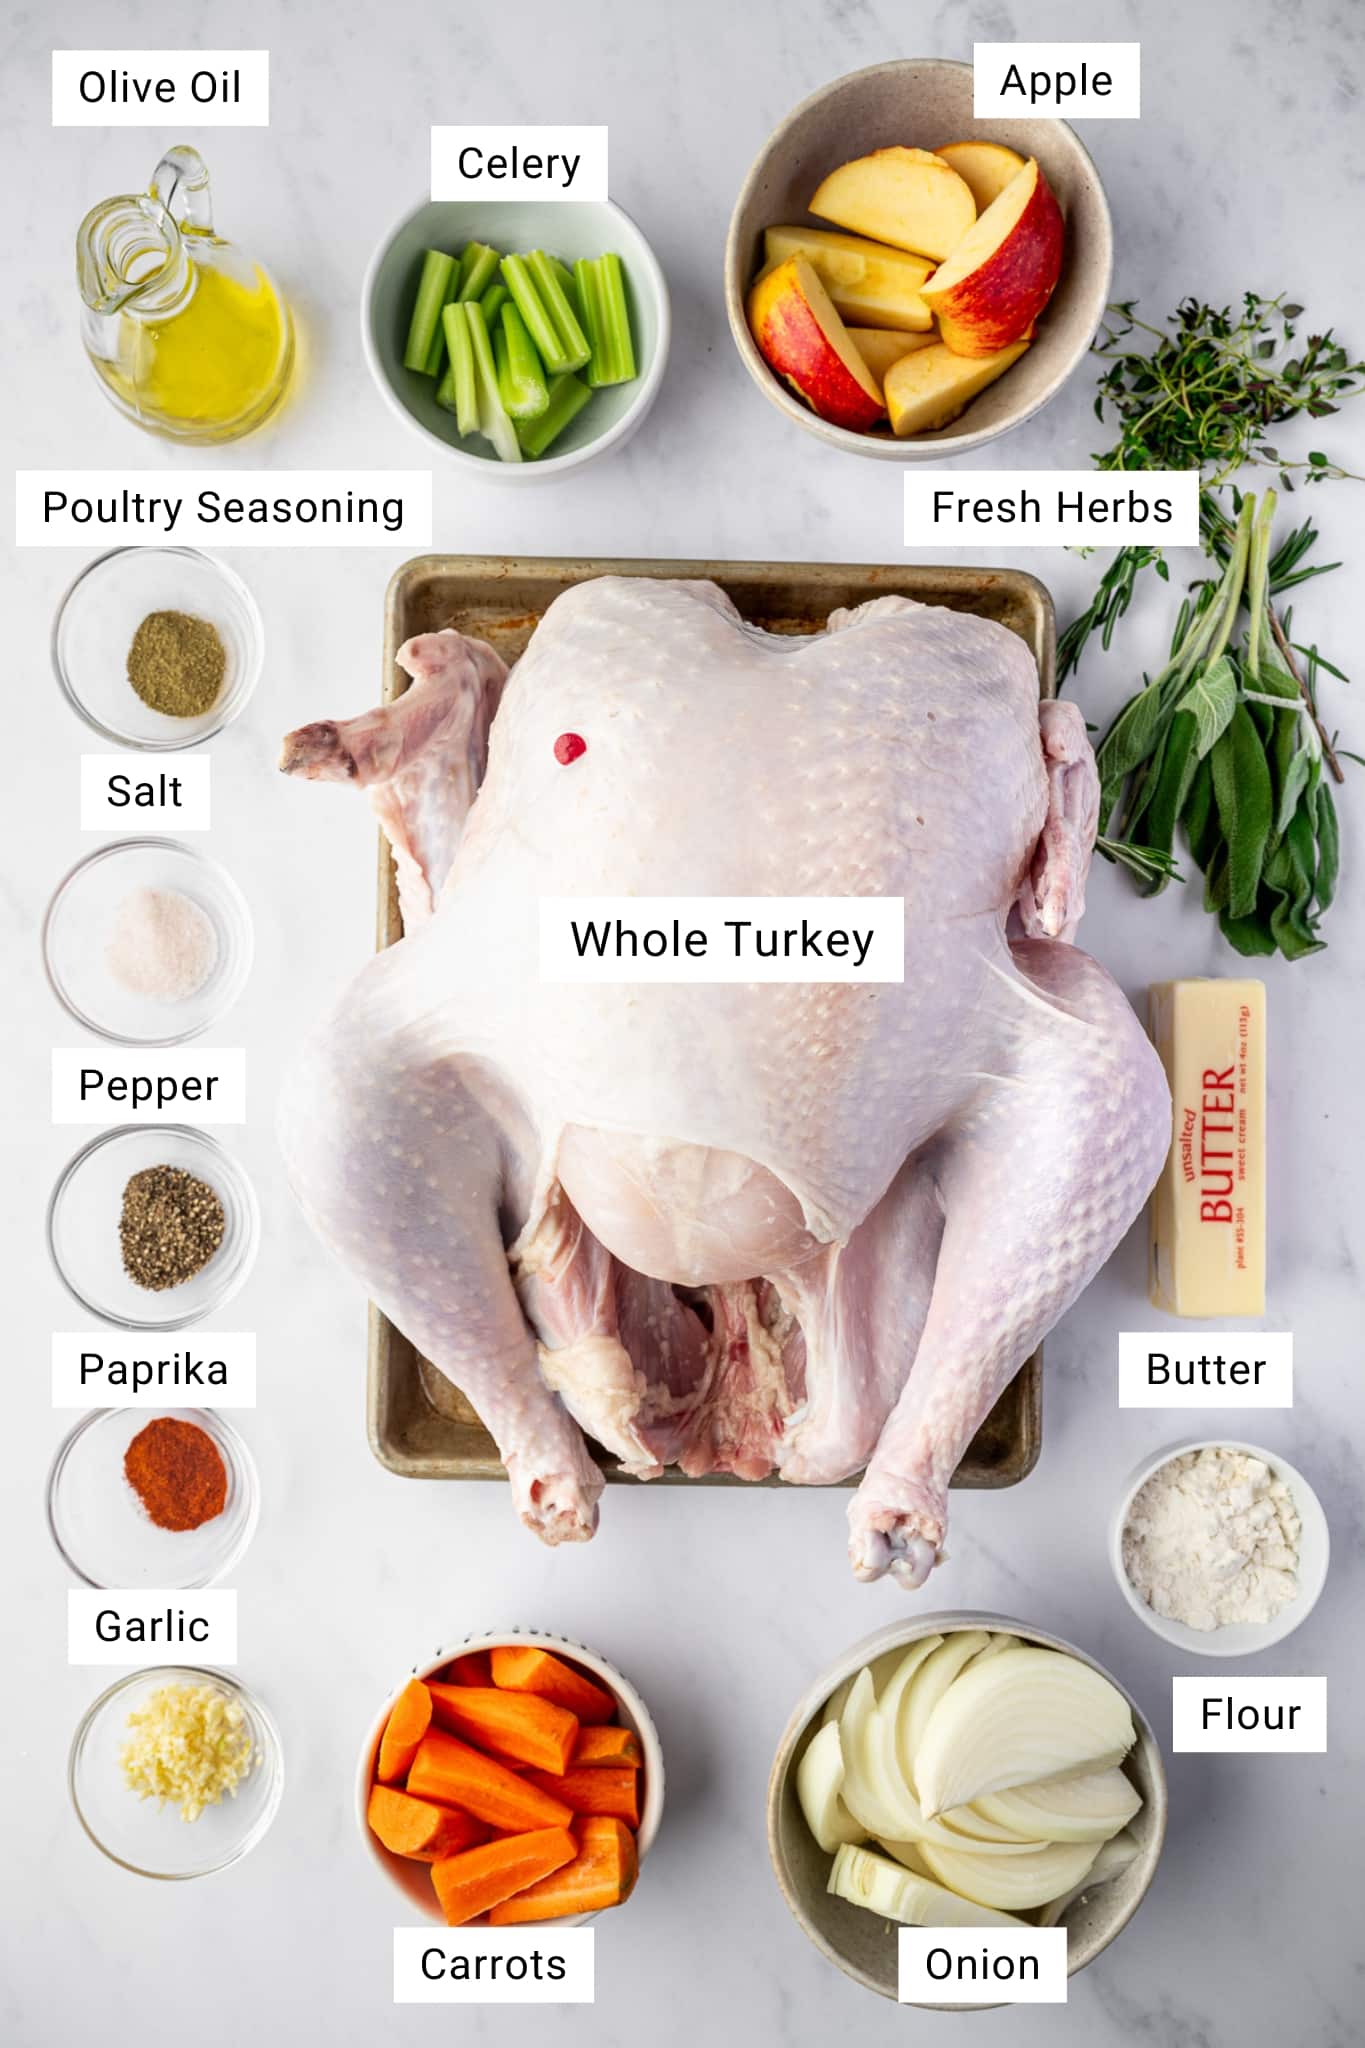
Roast Turkey Ingredients
These basic ingredients work together to create juicy meat, crispy skin, and classic Thanksgiving flavor.
- Whole Turkey: You can make this with any fresh or frozen turkey. If frozen, thaw it completely in the refrigerator before seasoning. Not sure what size to buy? See my Turkey Size Guide and Thawing Instructions.
- Butter: Softened butter spreads easily under and over the skin, creating a rich, golden crust and locking in moisture. You can use salted or unsalted butter. Unsalted butter will give you full control over flavor and sodium content.
- Olive Oil: I like to mix a little olive oil into the butter for two reasons. First, it helps the butter spread more smoothly, and second, it promotes crisp, even browning (without burning).
- Seasonings: I learned how to cook a turkey from my dad who would season our holiday turkey with salt and pepper. While I love his super simplistic approach, I like to add a little paprika and poultry seasoning for extra holiday flavor and aroma.
- Garlic: Fresh minced garlic adds savory depth. You can substitute with about 1 teaspoon of garlic powder if you prefer a smoother, milder rub.
- Aromatics (Onion, Apple, Carrot, and Celery): These aromatics flavor the cavity and the roasting pan. As they cook, they infuse the turkey and drippings with a subtle sweetness and rich, savory flavor.
- Fresh Herbs (Rosemary, Sage, Thyme): The signature trio of Thanksgiving herbs. They add fresh, earthy fragrance and depth to both the turkey and the pan juices.
- Chicken or Turkey Stock: Keeps the bottom of the roasting pan from burning, adds gentle steam to keep the meat moist, and forms the base for a simple, flavorful gravy.
Tools and Equipment
You really only need three things to cook a whole turkey. I’ve include them below, along with some optional suggestions.
- Roasting Pan: It’s basically an extra large baking dish. Most come with a rack for the turkey to sit on as it cooks, so air can circulate evenly. You can purchase an expensive roasting pan, mid-priced roasting try, or use a disposable roasting pan just like my dad always used.
- Instant-Read Thermometer: The single most important tool for juicy turkey. You can use a wireless probe thermometer (many even come with bluetooth features), an instant read thermometer (this is the one I use), or a basic meat thermometer.
- Carving Knife: A sharp carving knife makes clean slices. I own this carving knife & fork set, but any sharp and sturdy knife will get the job done.
- Fat Separator (Optional): Makes it easy to separate fat from pan drippings when preparing gravy.
Tip: Make sure you have plenty of aluminum foil and paper towels on hand before you start cooking.
Turkey Do’s and Don’ts
Knowing what to do (and what not to do) can make all the difference between a dry, overcooked turkey and one that’s juicy, flavorful, and perfectly golden.
Do:
- Thaw completely. Give your turkey plenty of time to thaw in the refrigerator – about one full day for every 4 to 5 pounds. A fully thawed turkey cooks evenly from edge to center. Not sure when to start? Jump to my thawing guide below.
- Let the turkey rest at room temperature for 30 minutes before cooking. This encourages even cooking and helps the skin crisp up.
- Pat the skin dry. Moisture prevents browning, so make sure the surface is completely dry before adding the butter mixture. This is the secret to crisp, golden skin.
- Use a thermometer. A reliable meat thermometer guarantees juicy, perfectly cooked turkey every single time. Check for 165°F in the thickest part of the thigh and around 160°F in the breast.
- Save the turkey giblets, neck, and carcass. You can use the giblets and neck to make homemade gravy, or toss them into a pot with the leftover turkey carcass (bones) and make homemade turkey stock!
Don’t
- Don’t wash the turkey. Seriously please, you guys, do NOT wash your turkey. It spreads bacteria and isn’t necessary for food safety. Any bacteria will cook off in the oven.
- Don’t brine. The garlic-herb butter in this recipe keeps the turkey moist and flavorful without the mess, planning, or extra steps of a brine.
- Don’t baste (unless you really want to). The butter under the skin does all the work. Opening the oven door to baste only lowers the oven temperature and lengthens the cooking time. Every peek releases heat and adds extra cooking time
- Don’t cook stuffing inside the turkey. It slows down cooking, resulting in an overcooked turkey and uncooked stuffing. Make Thanksgiving dressing (aka stuffing) separately for the best texture and food safety.
What Size Turkey Do You Need
As a general rule, plan for about 1 to 1½ pounds of turkey per adult. If you love leftovers or have big eaters, aim for the higher end of that range.
| Number of Guests | No Leftovers (1lb/person) | With Leftovers (1.5 lb/person) |
|---|---|---|
| 4-6 people | 4-6 pounds | 6-9 pounds |
| 6-8 people | 6-8 pounds | 9-12 pounds |
| 8-10 people | 8-10 pounds | 12-14 pounds |
| 10-12 people | 10-12 pounds | 14-16 pounds |
| 12-14 people | 12-14 pounds | 16-18 pounds |
| 14-16 people | 14-16 pounds | 18-20 pounds |
Tip: Turkeys larger than 14 pounds can cook unevenly and may not even fit in your oven (please, learn from my mistakes)! If you need to cook a very large turkey, consider cooking two smaller birds instead.
Cooking for a smaller group or only want white meat? Try my Juicy Roast Turkey Breast Recipe.
Remember to Thaw the Turkey -Early!
The biggest mistake that you can make is not giving your turkey enough time to thaw. The easiest way to do it safely and properly is in the refrigerator. It takes about 24 hours per 5 pounds of turkey, so remember to plan ahead.
To defrost, keep the turkey in its packaging and place it on a rimmed baking sheet or large tray to catch any drippings.
- 8-12 lb turkey: 2 to 3 days
- 12-16 lb turkey: 3 to 4 days
- 16-20 lb turkey: 4 to 5 days
If you need to thaw your turkey fast, you can submerge it in cold water, allowing approximately 30 minutes per pound. To keep the water cold, it will need to be changed every 30 minutes or so.
How to Tell If Your Turkey Is Fully Thawed
If you’re unsure whether your turkey is fully thawed, check the cavity. The giblet bag should come out easily, it should be ice-free, and the meat should feel soft and pliable.
Never Thaw a Turkey at Room Temperature
Leaving a turkey on the counter can cause bacteria to grow on the surface before the inside thaws. Always thaw in the refrigerator.
Make-Ahead Thanksgiving Turkey Timeline
Here’s how I plan my Thanksgiving prep timeline:
| When | What to Do | Why It Matters |
|---|---|---|
| 4-5 Days Before | Transfer frozen turkey to the refrigerator to thaw (see thawing guide) | Safe, even thawing |
| 1 Day Before | Make the herb butter and refrigerate. Unwrap and air-dry the turkey skin in the fridge (optional). | Saves time on Thanksgiving morning & helps the skin crisp beautifully |
| Thanksgiving Morning | Remove from the refrigerator 1 hour before roasting | Allows even cooking |
| Roast Time | Follow the recipe & check internal temp early (see step-by-step guide) | Ovens can vary up to 25°F |
| Dinner Time | Rest 30 to 45 minutes before carving | Juicy, tender slices |
How Long to Cook A Turkey
Use the chart below as a quick reference for roasting times of an unstuffed turkey:
| Turkey Weight | Regular Oven at 325°F | Regular Oven at 350°F | Convection Oven at 325°F |
|---|---|---|---|
| 8-12 lb | 2¾ to 3 hr | 2½ to 2¾ hr | 2¼ to 2¾ hr |
| 12-14 lb | 3 to 3¾ hr | 2¾ to 3½ hr | 2¾ to 3 hr |
| 14-18 lb | 3¾ to 4¼ hr | 3½ to 4 hr | 3 to 3½ hr |
| 18-20 lb | 4¼ to 4½ hr | 4 to 4¼ hr | 3¼ to 3¾ hr |
Tip: Ovens can vary by as much as 25°F, so use a meat thermometer and start checking at least 1 hour early.
Do Turkeys Cook Faster in a Convection Oven?
Yes. The first time I roasted a turkey in my convection oven, I had no idea it would cook so much faster. When I checked on it an hour before it was suppose to be finished cooking, it was already cooked! This isn’t really a bad thing…as long as you’re prepared for it.
- Check the internal temperature early (at least an hour before expected finish time).
- Position the rack lower in the oven so the fan isn’t blowing too close to the top of your turkey.
- Rotate the pan once halfway through cooking for even browning.
How to Cook a Turkey (Step-by-Step)
With your turkey fully defrosted, it’s time to get it in the oven. Not sure how long to cook your turkey? Skip to Roasting Times and Temperature Guide.
Step 1: Prep the Turkey
Remove the turkey from the fridge 1 hour before roasting to help the turkey cook more evenly and stay juicy. Remove the neck and giblets found in the large cavity. You can save them to make stock or gravy (or discard).
Pat the entire bird dry inside and out with paper towels.
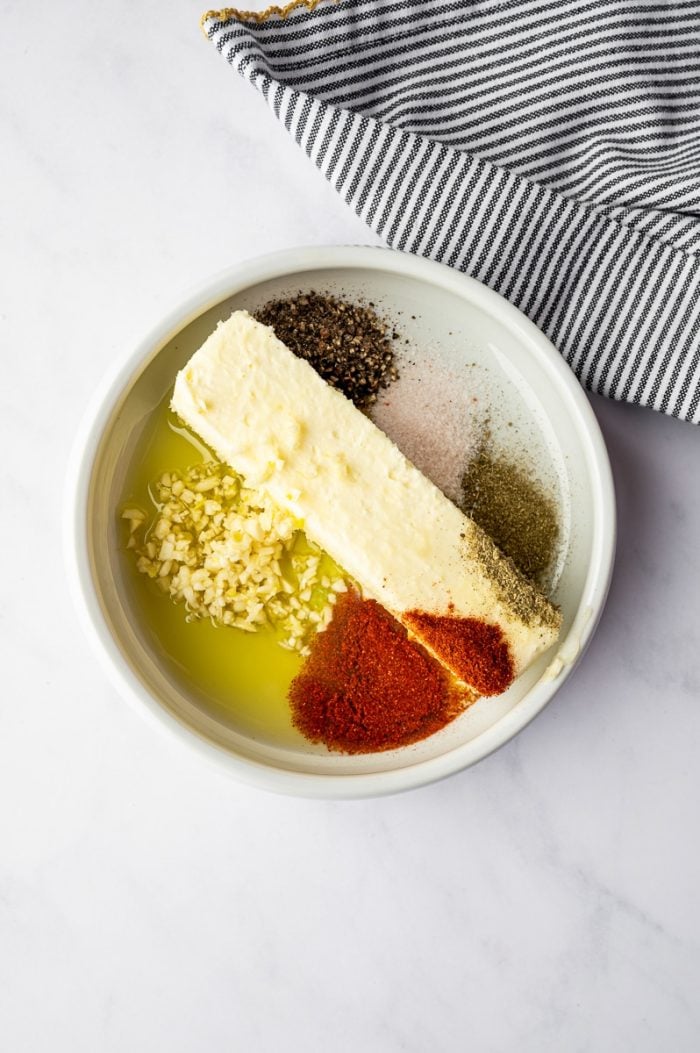
Step 2: Make the Herb Butter
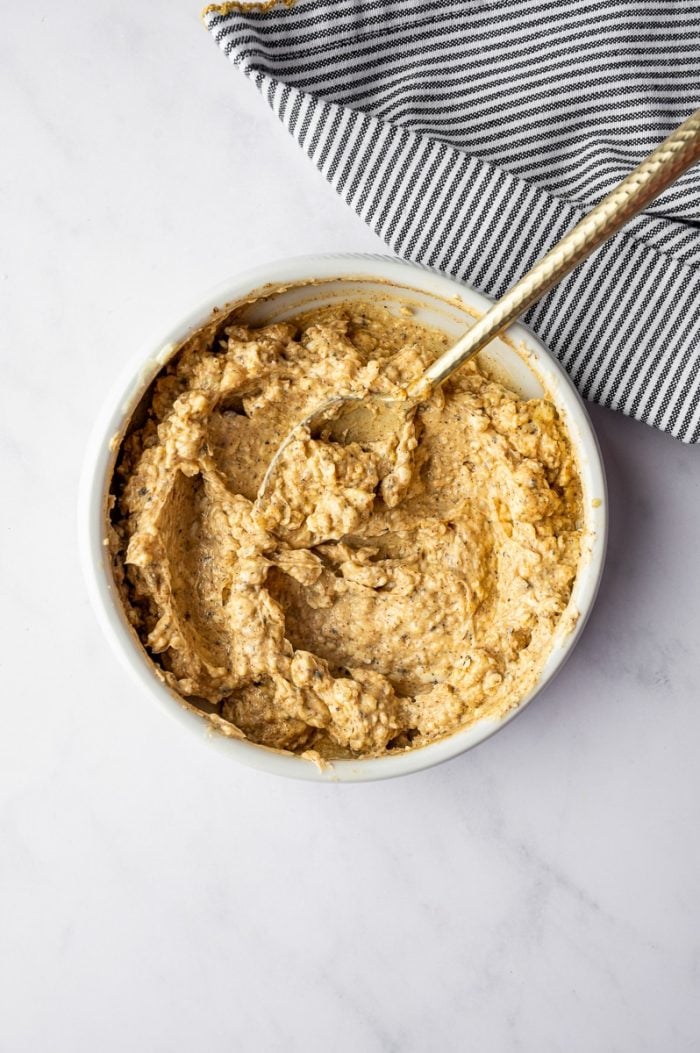
In a medium bowl, mix together softened butter, olive oil, garlic, salt, pepper, paprika, and poultry seasoning. The butter should be soft and spreadable, not completely melted, so it easily clings to the skin and holds the herbs in place.
Make-ahead tip: Prep the butter mixture a day ahead. Let it soften slightly before spreading under the skin. It’s an easy way to save time and helps the flavors meld.
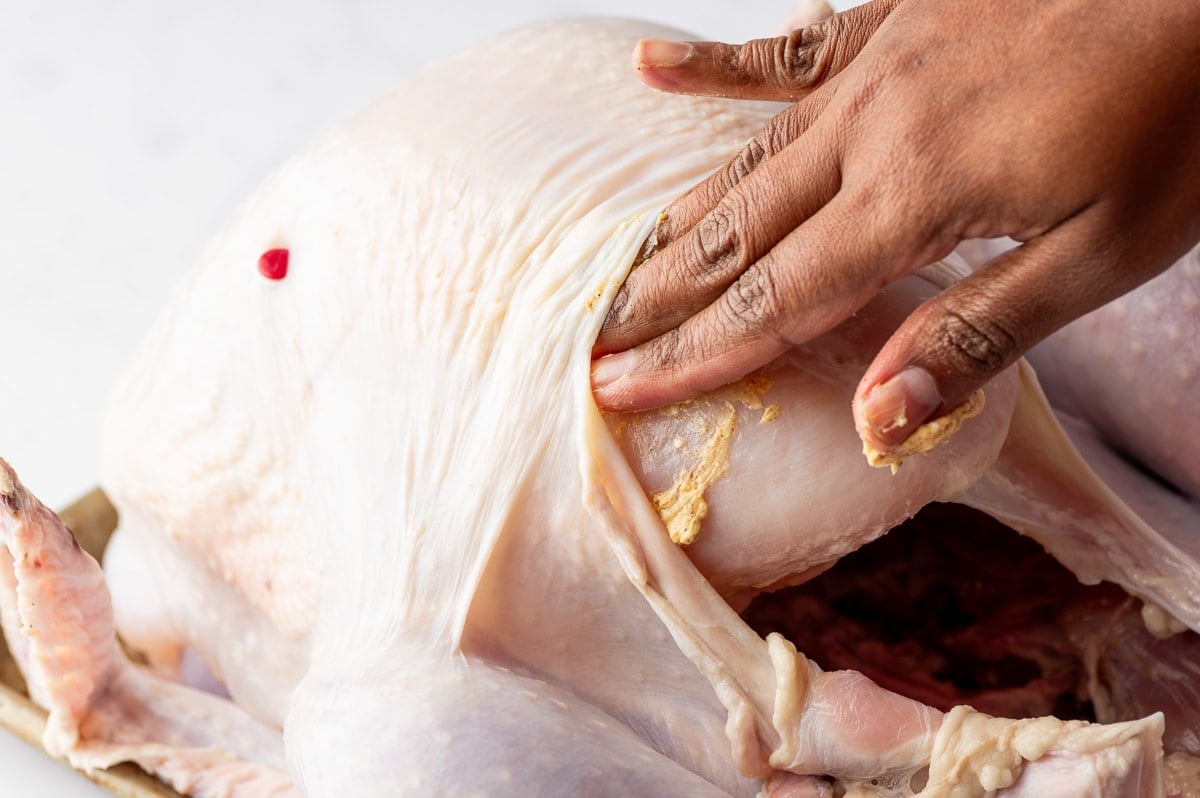
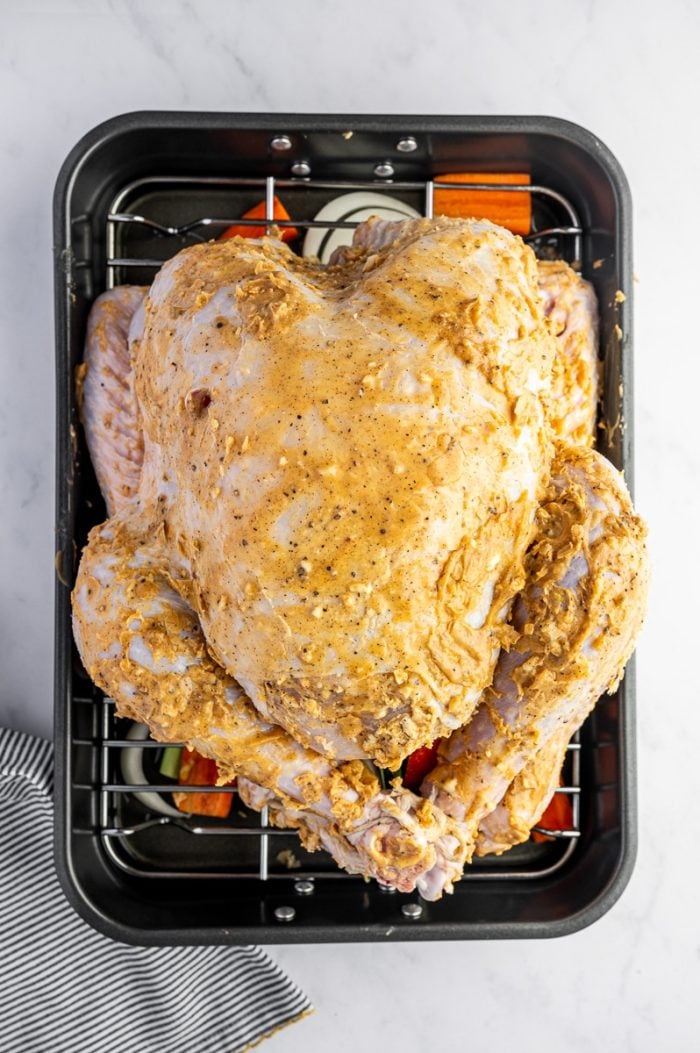
Step 3: Season Under and Over the Skin
Next, gently slide your fingers between the skin and the top of the breasts to loosen. Spread about 1/3 of the herb butter mixture underneath the skin. Use the remaining butter mixture to coat the entire outside of the turkey.
The butter should cling to the skin, not slide off. If it does, the turkey may still be too cold, or wet. See more Troubleshooting Tips and Frequently Asked Questions.
Step 4: Fill and Truss
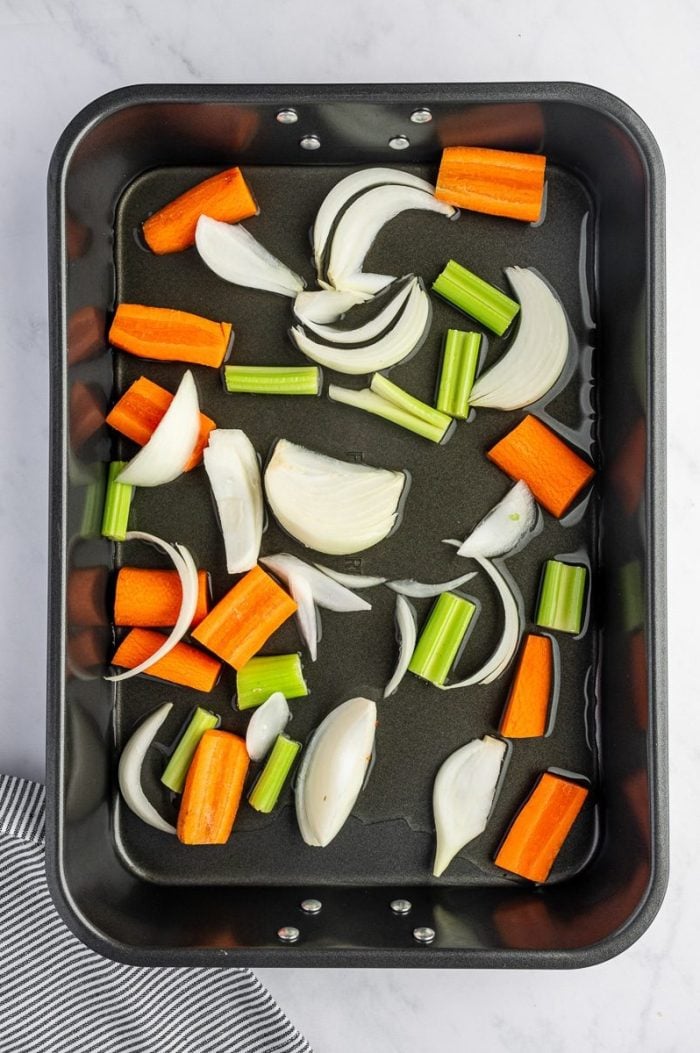
Fill the cavity with aromatics like onion, apple, carrot, celery, and a few sprigs of fresh herbs. Tie the legs loosely with kitchen twine (optional) and tuck the wing tips under the body.

Step 5: Set Up the Roasting Pan
Scatter chopped onion, carrot, and celery across the bottom of your roasting pan and pour in about 2 cups of chicken or turkey stock. Set the rack inside the roasting pan and place the turkey breast-side up on top. This setup allows the turkey to roast evenly while the vegetables and stock catch the drippings.
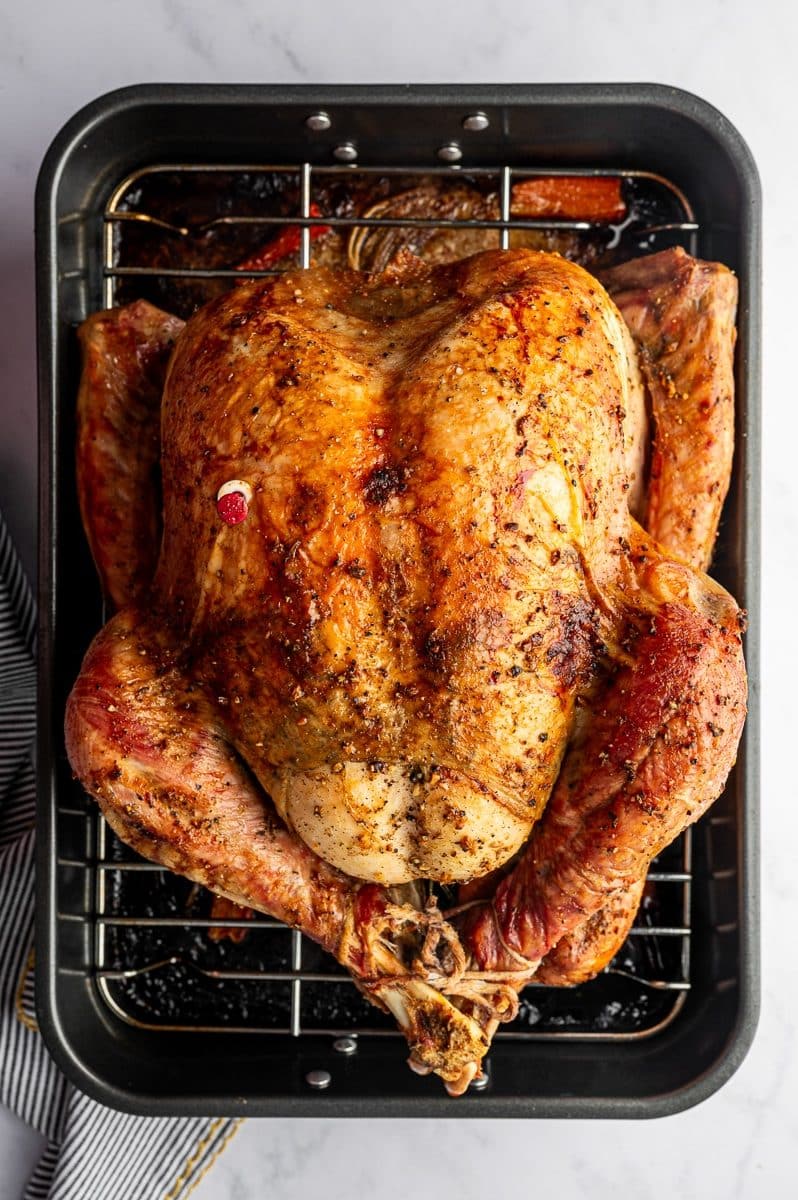
Step 6: Roast the Turkey
Preheat your oven to 325°F (165°C) and roast the turkey uncovered. Basting is optional. Cooking time will depend on the weight of your bird, oven temp, and type of oven you’re using (see the section above), but plan for about 13 to 15 minutes per pound or reference the Cooking Time Chart above.
To prevent accidental overcooking, start checking the internal temperature 60 minutes before the lowest estimated time.
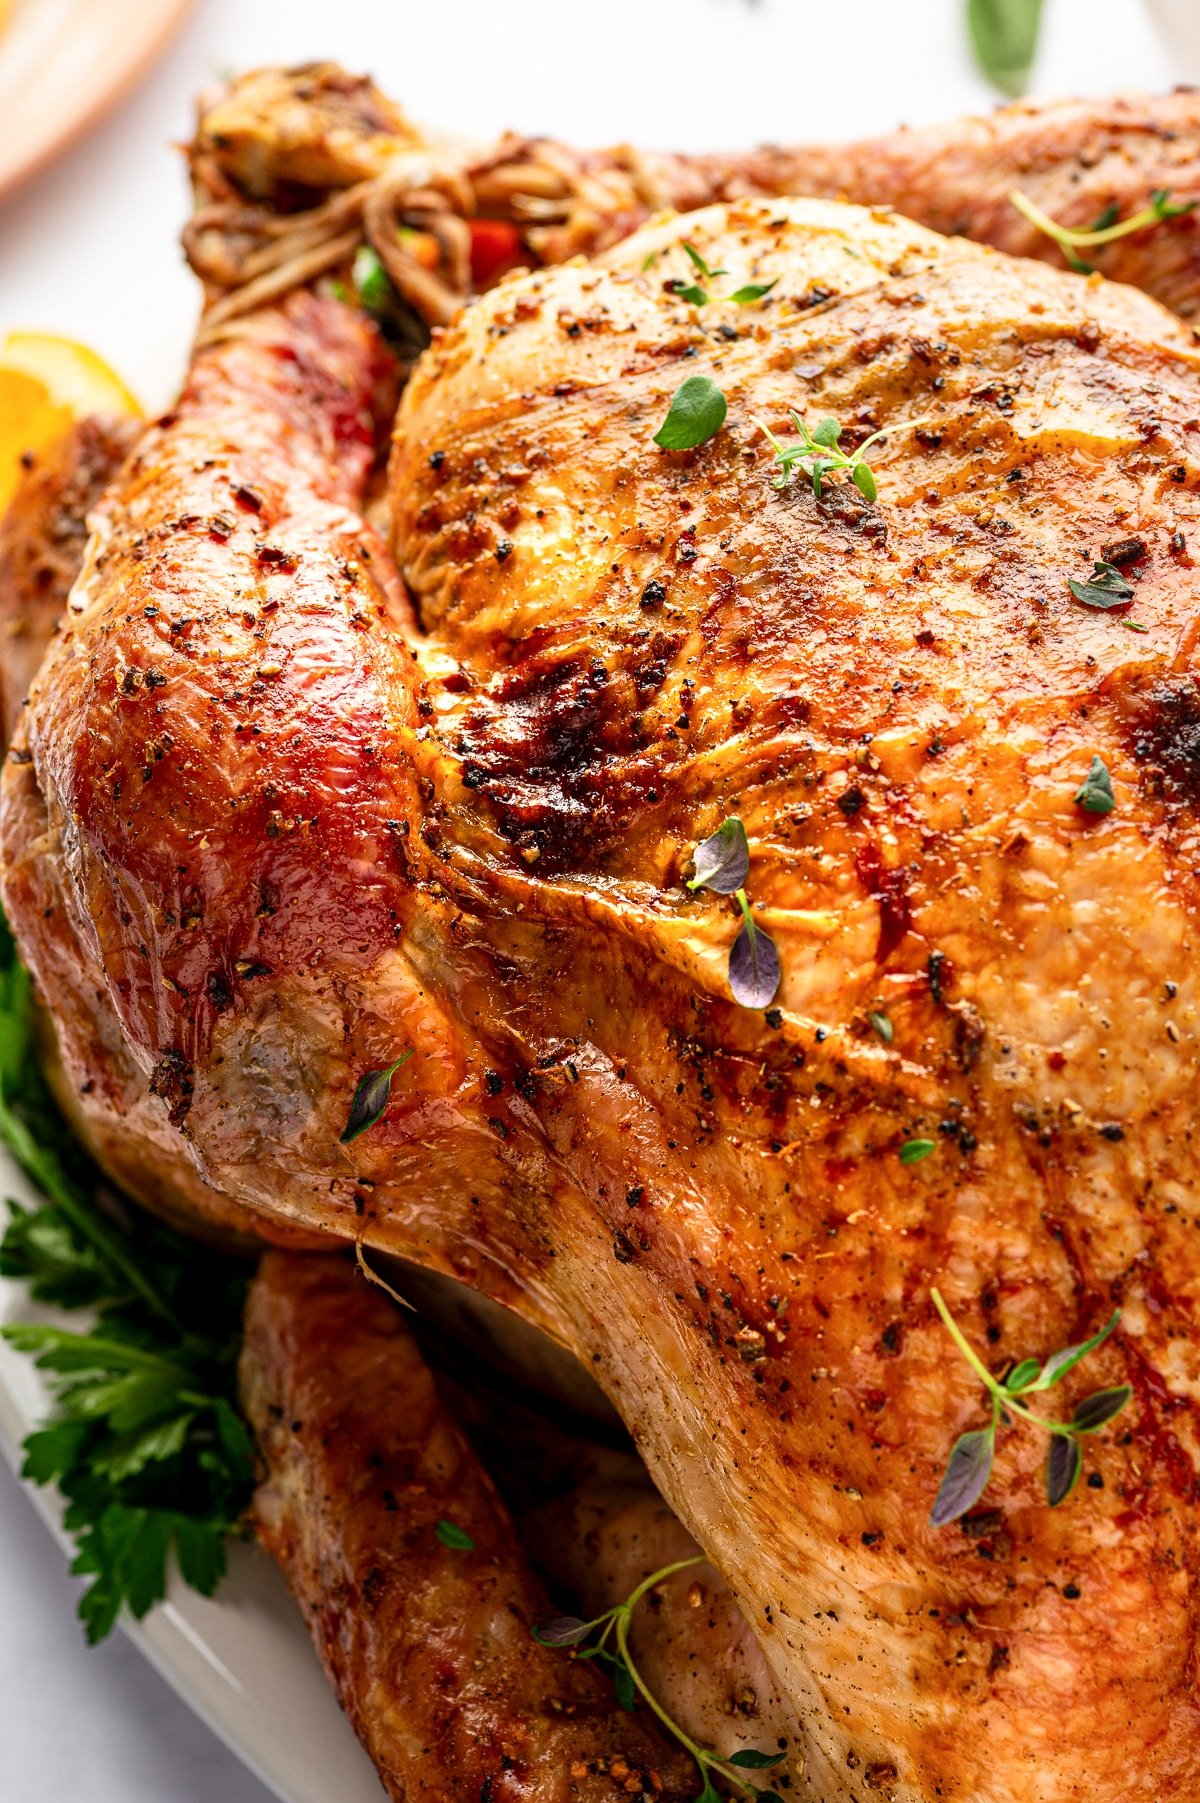
Tip: If the skin is browning too quickly, tent the turkey loosely with foil. Remove the foil during the last 30 minutes for the skin to crisp back up.
The USDA recommends cooking turkey to the target temperature of 165°F (74°C), but the thighs and legs are actually best when they’re cooked to 175°F. To keep breast meat juicy, I like to pull my turkey from the oven once it registers 155-160°F. The carryover heat during resting will bring the temperature up to 165°F.
Remember to measure in the thickest part of the breast and the innermost thigh and wing. If stuffed, the center of the stuffing must also register 165°F (74°C).
Step 7: Rest the Turkey
Once your turkey is fully cooked, transfer it to a cutting board and tent it loosely with foil. Let it rest for 30 to 45 minutes before carving. Resting allows the juices to redistribute throughout the meat so every slice stays moist and flavorful.
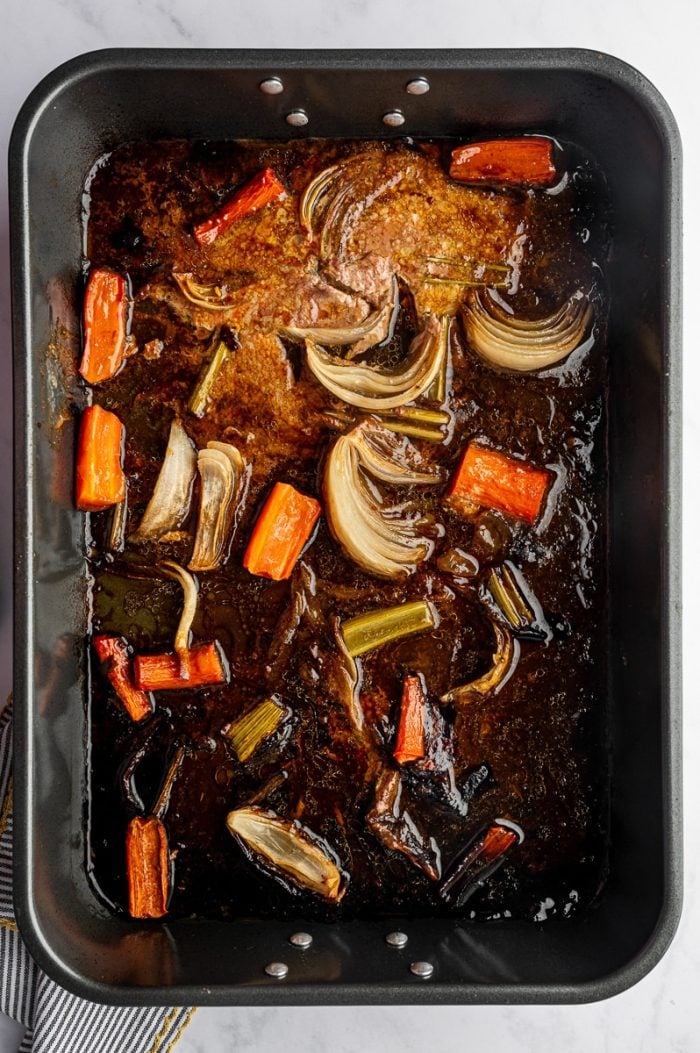
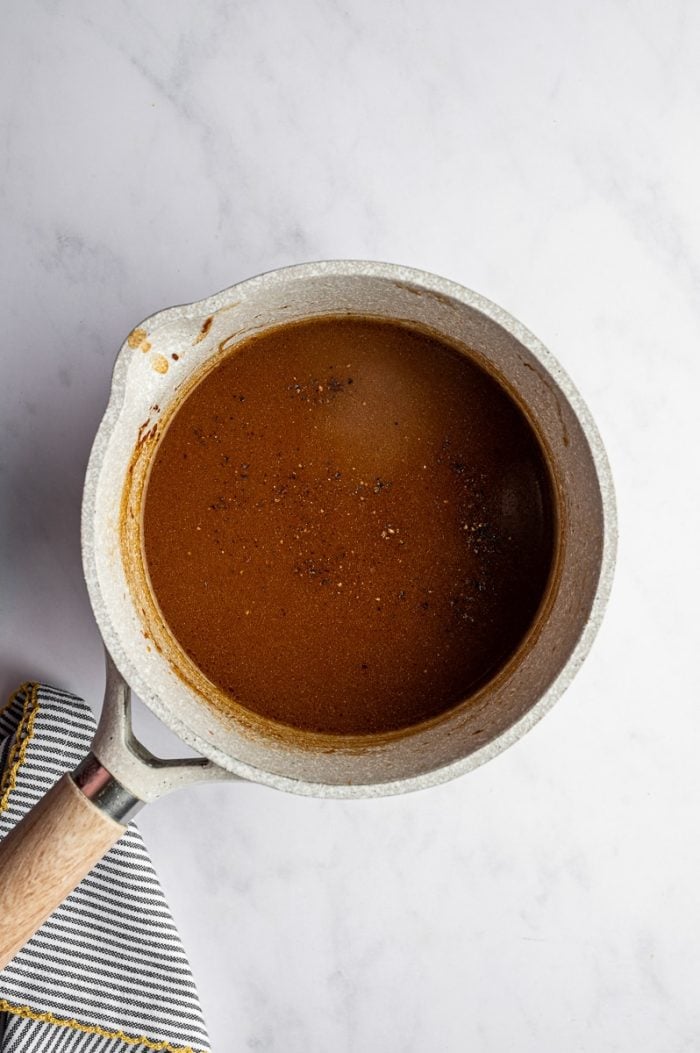
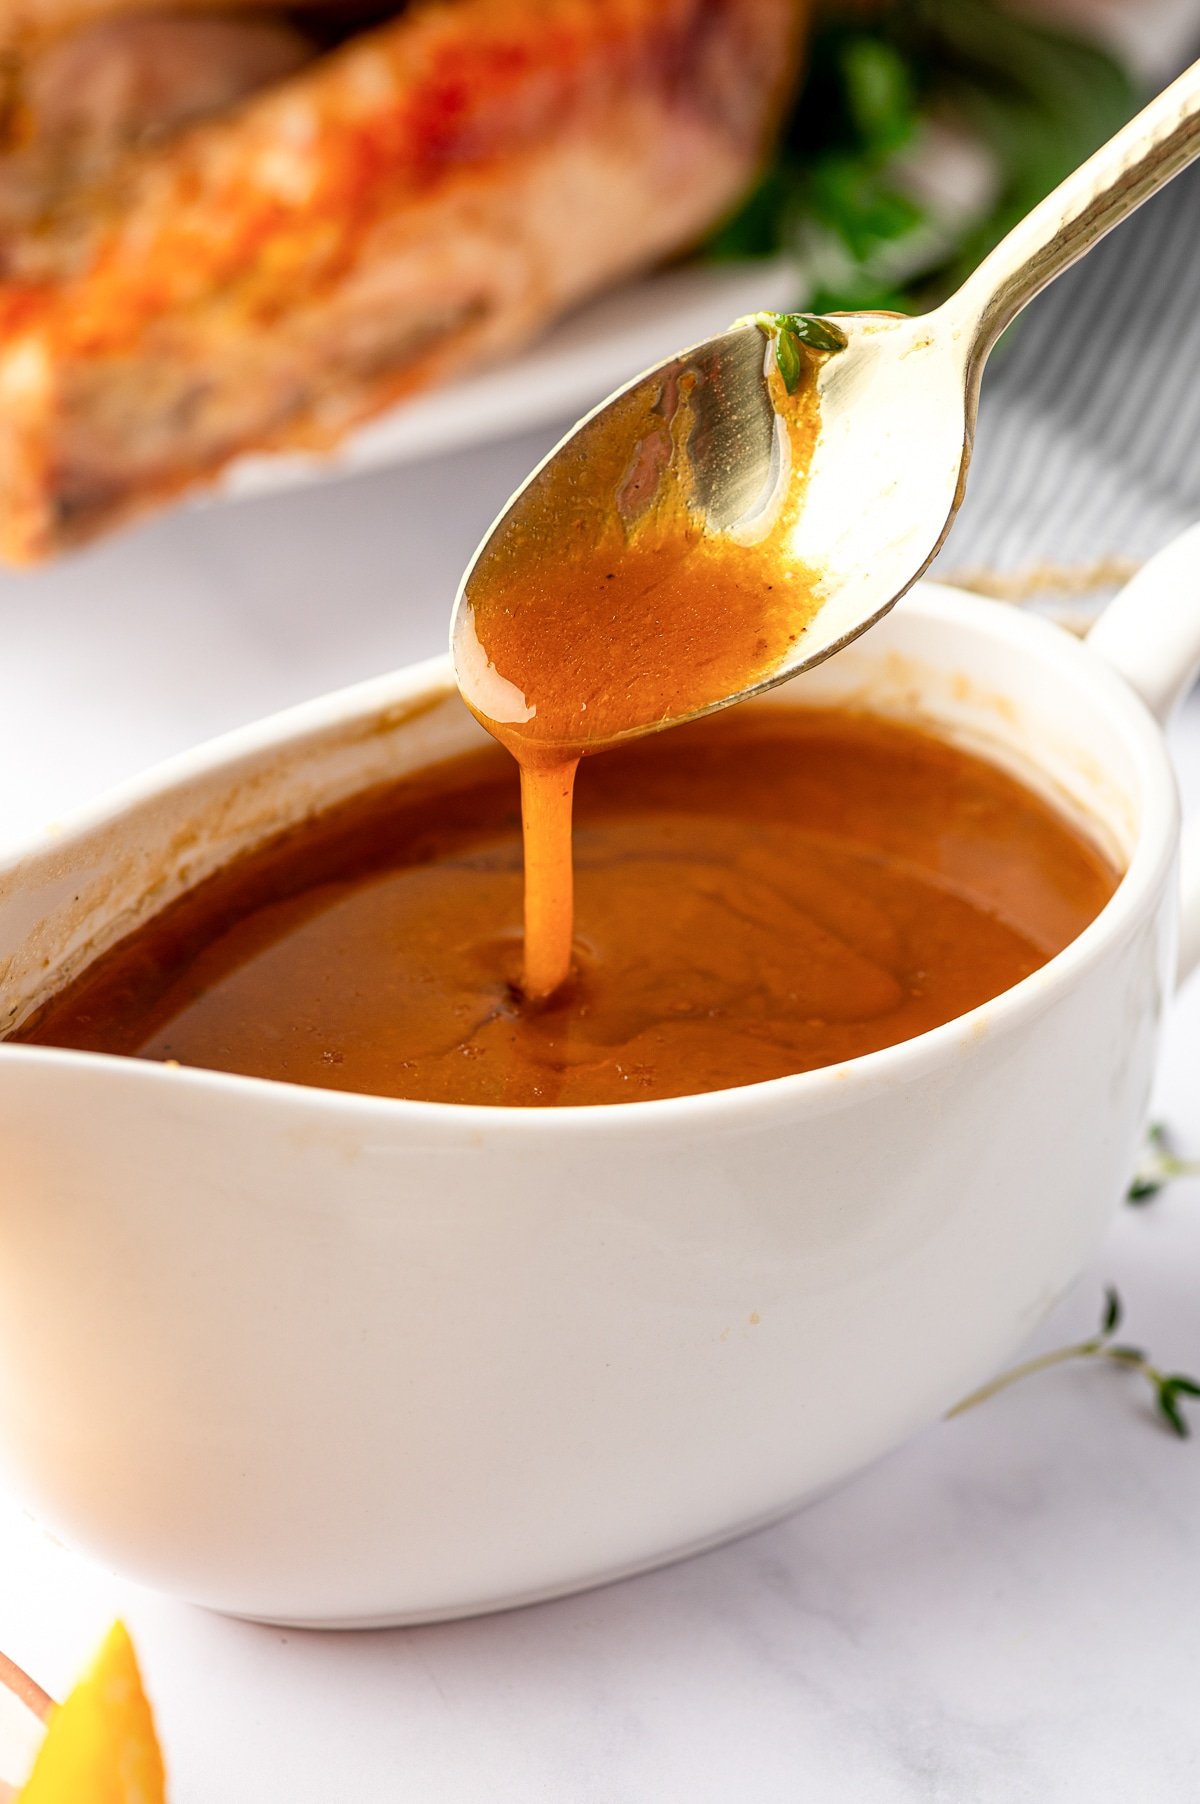
Step 8: Save the Turkey Drippings
After the turkey finishes roasting, you will notice flavorful juices and browned bits at the bottom of the roasting pan. These are the drippings, and they make the most delicious homemade Turkey Gravy. Carefully strain the drippings through a fine-mash strainer into a heat-safe container and set them aside. You can also use the turkey neck and giblets that were removed before cooking to make a rich giblet gravy if you like.
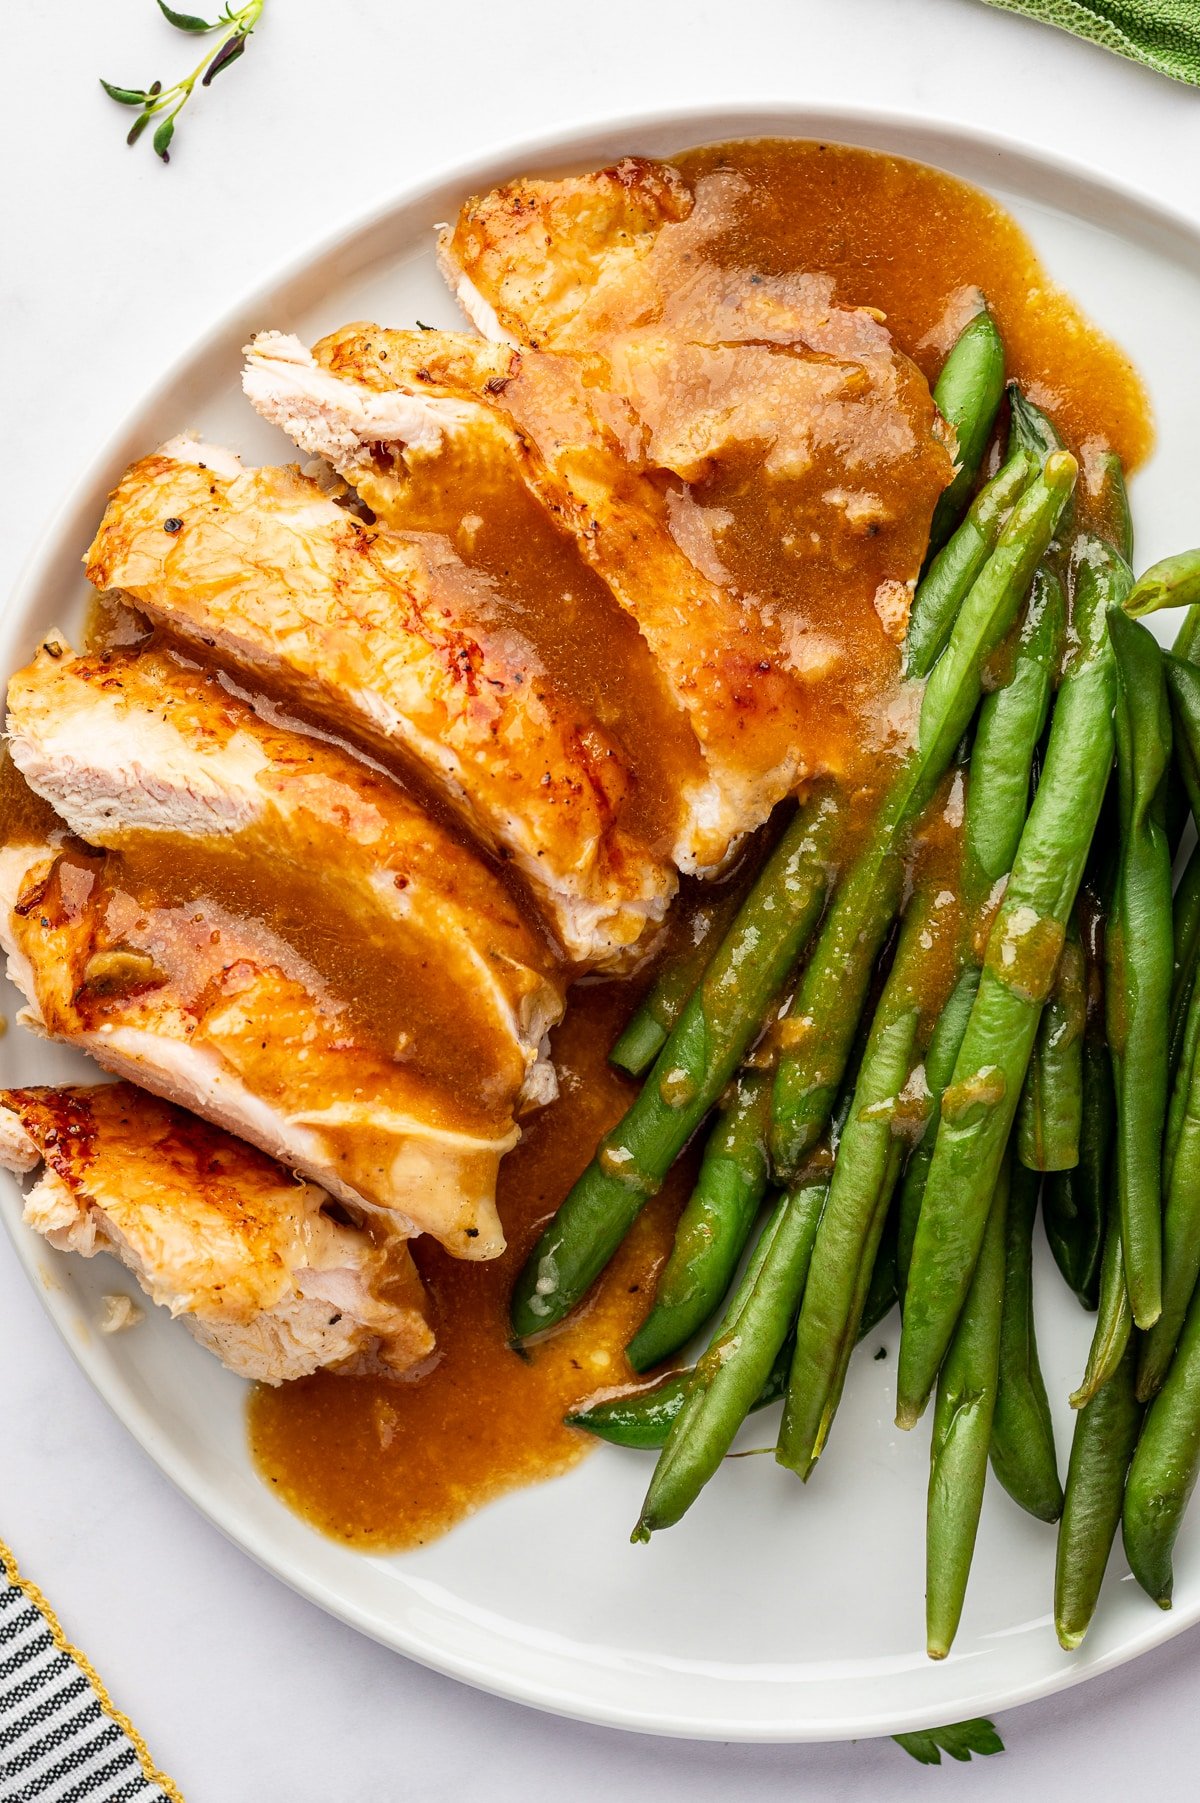
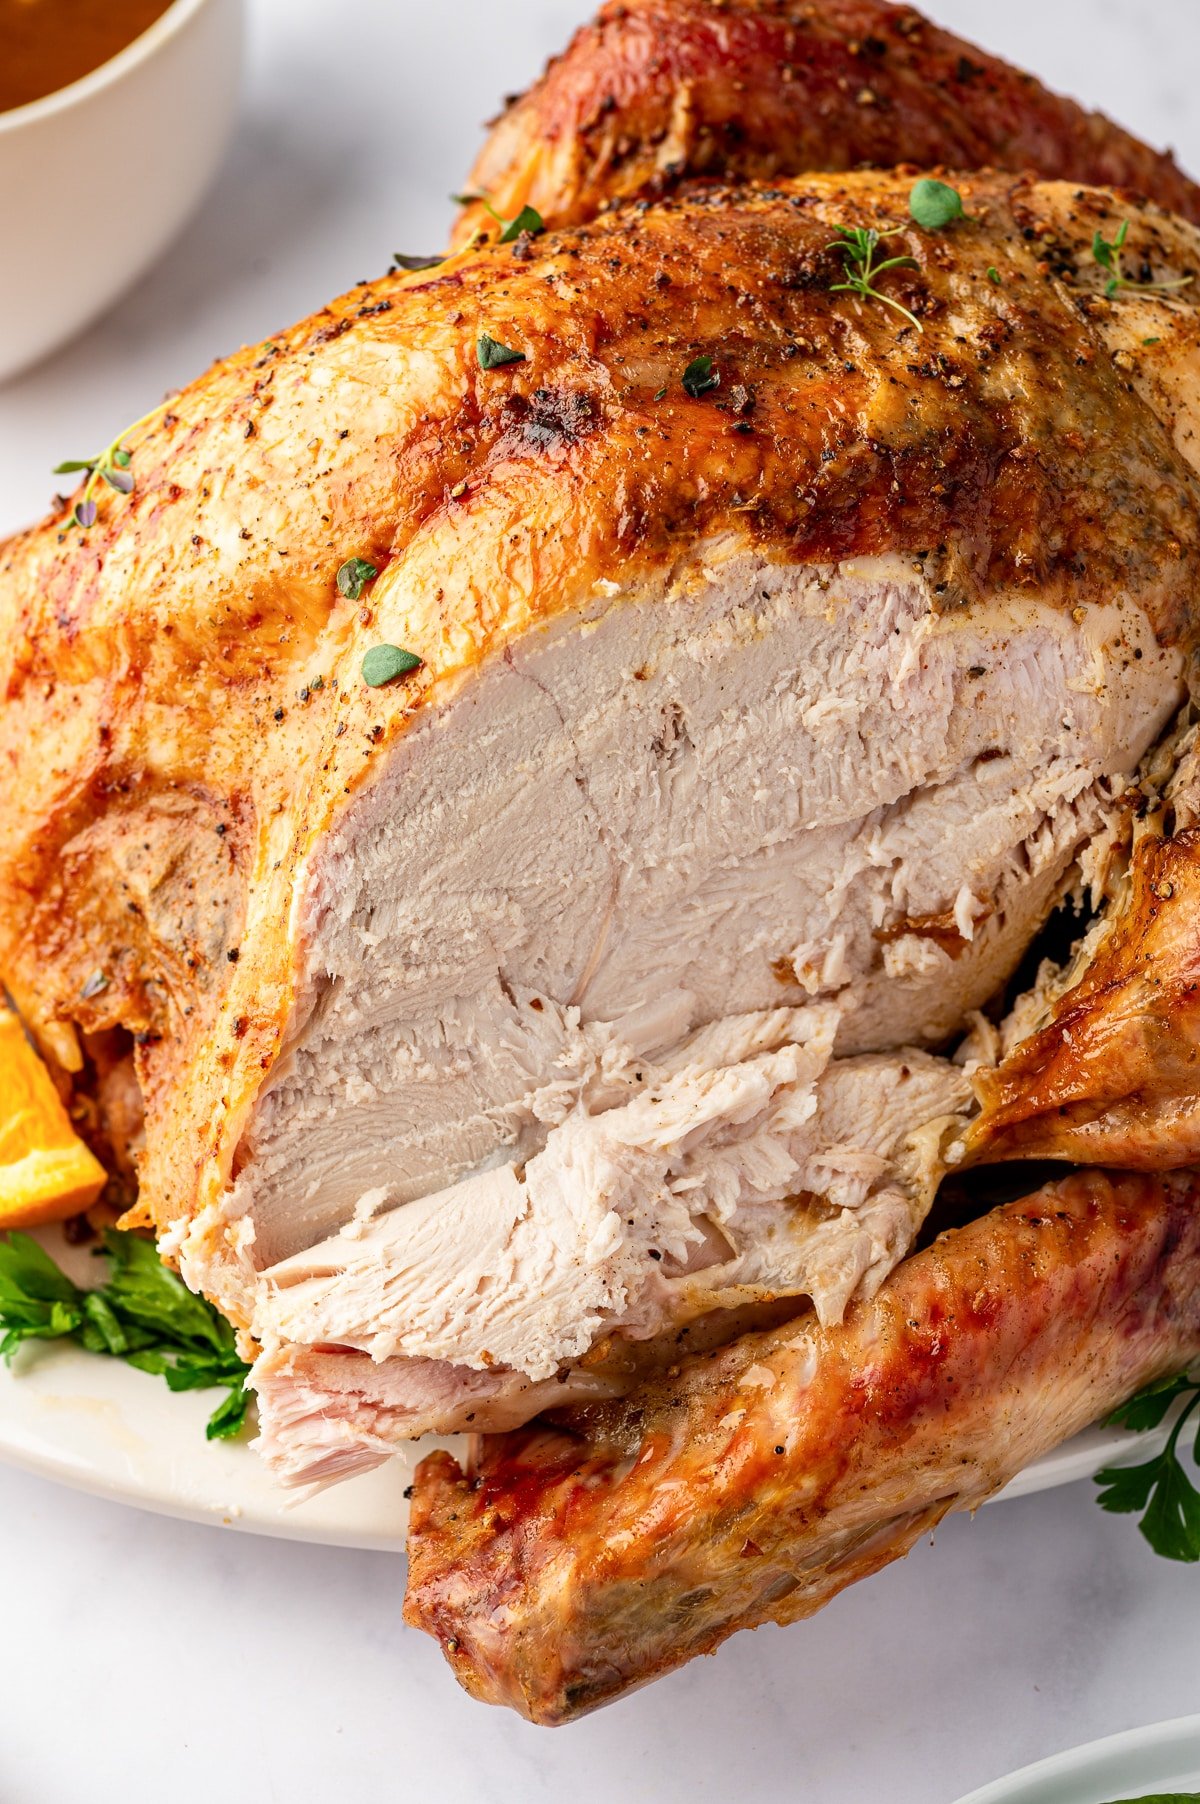
Step 9. Carve and Serve
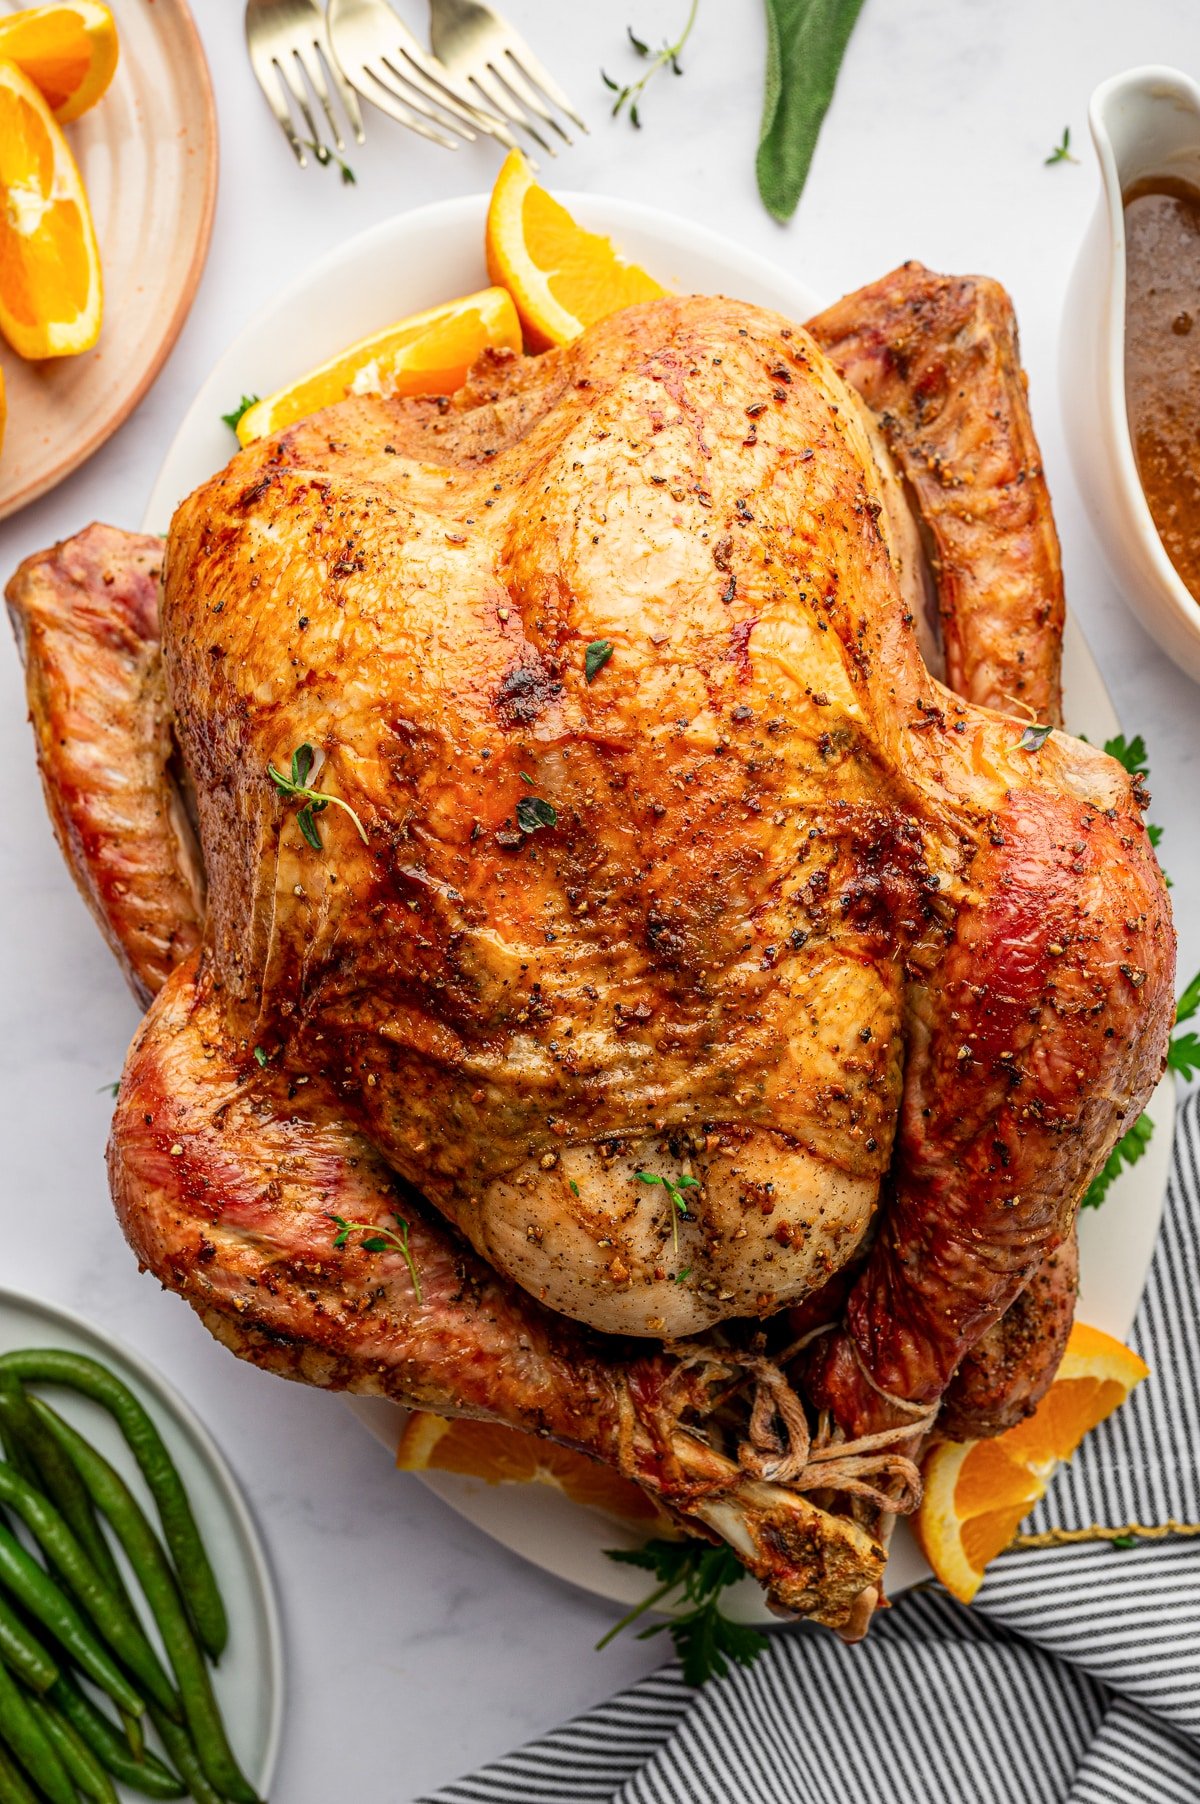
Use a sharp carving knife to separate the legs, thighs, wings, and breasts. Slice the breast meat against the grain into even pieces. Arrange everything on a large serving platter and garnish with fresh herbs, citrus slices, or pomegranate seeds for a beautiful holiday presentation.
Check out the Food Network for a visual guide on how to do it step-by-step (admittedly, I am still working on my carving skills).
Serving Ideas
For a complete holiday spread, serve your Thanksgiving turkey with the following:
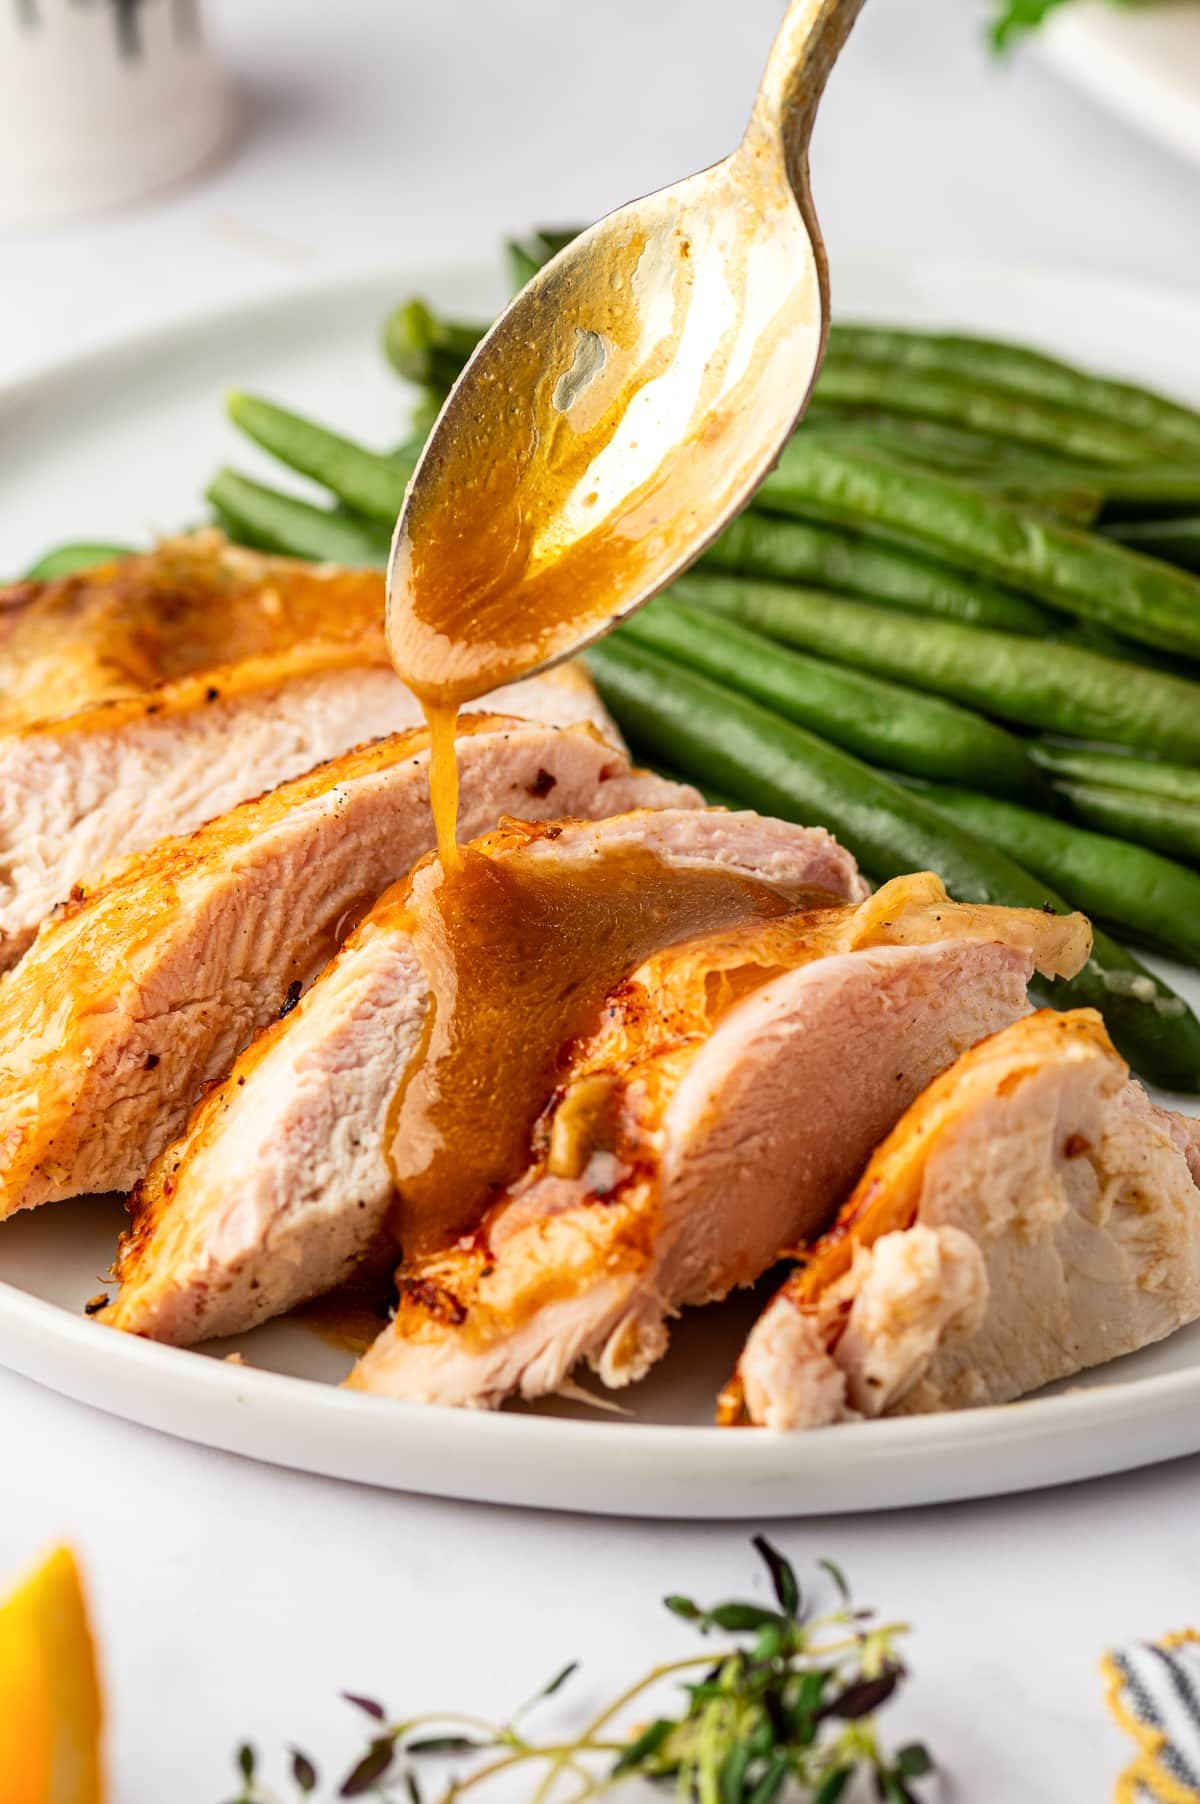
- Smooth and silky Homemade Gravy – no drippings needed!
- Cranberry Sauce
- Mashed Potatoes, Crockpot Mashed Potatoes, or Mashed Cauliflower
- Instant Pot Mashed Sweet Potatoes or Sweet Potato Casserole with Marshmallows
- Roasted Root Vegetables
- Air Fryer Brussels Sprouts
- Spinach Pear and Feta Salad
- Homemade Dinner Rolls
- Fresh Green Bean Casserole or Slow Cooker Green Bean Casserole with canned green beans, condensed cream of mushroom soup, and fried onions
Turkey Troubles? Here’s How to Fix It
If something seems off, here’s how to fix it – asap.
The turkey is browning too quickly:
Tent the turkey loosely with foil and continue roasting. Remove the foil during the last 20 to 30 minutes to re-crisp the skin.
The skin looks pale and soft:
Increase the oven temperature to 425°F for the final 10 to 15 minutes and let the skin finish browning uncovered.
The breast is done but the thighs are undercooked:
Carve off the breast meat and set aside. Tent the undercooked portion of the turkey with foil, return to the oven, and cook until the thighs reach 165°F.
The turkey is taking longer than expected:
Do not turn up the heat right away. First, check that your oven is truly at temperature. If needed, raise the heat to 350-375°F at the very end.
Dry breast meat:
Likely happened because the breast meat cooked faster than the legs and thighs. You can brush melted butter or warm stock to restore moisture and serve it with plenty of gravy (honestly, no one will know the difference).
The pan drippings are burnt:
Pour out burnt bits, add fresh stock, scrape the pan well, and build your gravy with the flavorful juices that remain.
Still stuck? Check out these Frequently Asked Questions or Leave Me A Comment below.
How to Store Leftover Turkey
Who doesn’t love a fridge full of turkey leftovers? Here’s how to keep them safe, fresh, and tender.
- Refrigerator: Store leftover turkey in airtight containers for up to 4 days. If you can, remove the meat from the bones while it’s still warm (trust me, it’s easier).
- Freezer: Freeze sliced or shredded turkey in freezer-safe bags for up to 3 months. Press out as much air as possible to prevent freezer burn.
- Reheat Gently: Warm leftovers in a 300°F oven, covered with foil and a splash of stock to keep the meat from drying out.
Favorite Leftover Turkey Recipes
Nothing goes to waste at my house. Here’s some simple recipes that you can make to make the most of your bird:
- Turkey Soup – The best way to make the most of your leftovers and healthy way to use up leftovers.
- Turkey Tetrazzini – My grandmother and dad made leftover turkey tetrazzini every year after Thanksgiving. This is my homemade version.
- Turkey Salad – Classic recipe made with juicy turkey, mayo, dried cranberries, and walnuts. Add it to a bowl of greens or buttery croissant.
- Turkey Stock – Made using the leftover bones, carcass, neck, and giblets. So much flavor!
- Turkey Sliders – Top leftover dinner rolls with leftover cranberry sauce, cheese, and shredded turkey. Warm in the oven for a toasty snack or lunch.
Frequently Asked Questions
No. Washing a turkey can spread bacteria around your sink and countertops. Any bacteria on the turkey will be destroyed in the oven, so it’s safer to skip rinsing and just pat the turkey dry with paper towels.
It’s better not to. Stuffing slows down the cooking process and can lead to uneven results. My recommendation is to cook your stuffing separately and fill the cavity only with aromatics like onion, herbs, and apple.
Yes. Here’s how I do it – First, make sure your turkey is thawed. Remove the giblet bag and neck, then pat dry with paper towels and season with salt and pepper. Refrigerate uncovered for up to 24 hours (or loosely tent it with foil). At the same time, prepare the herb butter mixture and refrigerate it with the turkey. About an hour before you plan to start cooking, remove the turkey and herb butter from the refrigerator. Allow them to come to room temp for about 30 minutes, then stuff with aromatics and coat with the butter.
If the butter isn’t sticking, it’s probably because the turkey is either too wet or too cold. Make sure to pat the skin completely dry with paper towels before seasoning. Also, let the turkey rest at room temperature for 30 minutes before adding the butter mixture; if the skin is very cold, the butter will harden on contact and slide right off. For the best results, keep the butter soft and spreadable (not melted) so it clings smoothly to the skin.
Only if the skin is browning too quickly. Tent the turkey loosely with foil and remove it near the end of cooking so the skin can become golden and crisp.
Not with this recipe. The butter rubbed under the skin keeps the meat juicy and flavorful. Plus, opening the oven door too often to baste lets heat escape, which can extend the cooking time.
No problem! You can make a simple rack by placing thick carrots, celery sticks, or halved onions under the turkey in the roasting pan. This lifts the turkey just enough so it’s not sitting in the drippings.
Yes! While butter helps create rich flavor and beautifully golden skin, you can absolutely make this recipe without it. Replace the butter with olive oil for a dairy-free option and season the turkey the same way.
A perfectly roasted turkey is the heart of a great Thanksgiving meal, and now you can make it with confidence year after year. This recipe has never let me down, and I know it will become a tradition in your home too. Wishing you a delicious, relaxing, and happy holiday!
- Cooking for a smaller group? Try my Roasted Turkey Breast Recipe.

Best Thanksgiving Turkey Recipe
Equipment
- Roasting Pan and Rack This is the one I've used for years.
- Probe Thermometer Absolutely essential
- Carving Knife A quality carving knife will last years.
Ingredients
For the Turkey
- 12-14 pound turkey, fully thawed
- 1 onion, peeled and quartered
- 1 apple, quartered
- 2 large carrots, chopped
- 2 stalks celery, chopped
- 2 sprigs fresh rosemary
- 2 sprigs fresh thyme
- 2 sprigs fresh sage
- 2 cups chicken or turkey stock
Herb Butter
- ¾ cup unsalted butter, softened
- 2 tablespoons olive oil
- 4 cloves garlic, minced
- 2-3 teaspoons kosher salt
- 1 teaspoon black pepper
- 1 teaspoon paprika
- 2 teaspoons poultry seasoning
Instructions
- About 1 hour before roasting, remove your fully thawed turkey from the refrigerator and let it rest at room temperature. This takes the chill off which helps the butter mixture stick properly and the turkey cook more evenly.
- Adjust the oven rack so that your turkey will sit in the center of your oven. If your roasting your turkey in a convection oven, position the rack in the lower position so that the top of your turkey is not too close to the convection fan.
- Preheat the oven to 325°F (165°C).
- Make the herb butter by combining ¾ cup softened unsalted butter, 2 tablespoons of olive oil, 4 cloves minced garlic, 2-3 teaspoons salt, 1 teaspoon pepper, 1 teaspoon paprika, and 2 teaspoons poultry seasoning in a small bowl. Mix until smooth and set aside.
- Remove the giblets and neck from the inside of the turkey (save them to make gravy or turkey stock if you'd like, or discard), then pat the turkey completely dry with paper towels.
- Gently loosen the skin over the breast using your fingers to create space for the butter. Spread about ⅓ of the herb butter mixture under the loosened skin, then rub the remaining butter all over the outside of the turkey.
- Place the onion, apple, and fresh herbs inside the turkey cavity. Tie the legs with kitchen twine (optional) and tuck the wing tips underneath the turkey to prevent them from burning.
- Scatter the chopped carrots, celery, and any remaining onion in the bottom of a large roasting pan. Add 2 cups of turkey or chicken stock.
- Place the turkey on the roasting rack positioned inside the roasting pan.
- Roast for about 13 to 15 minutes per pound. The turkey is ready when a meat thermometer registers 160°F in the thickest part of the breast (or 165°F to 170°F in the thigh). Remove from the oven.
- Check the turkey about halfway through roasting. Once the skin is a deep golden brown, loosely tent the top with foil to protect the breast meat from overcooking. Or, start covered and remove the foil during the final hour to allow the skin to brown.
- Transfer the turkey to a large cutting board placed inside a large rimmed baking sheet to catch any excess drippings. Tent loosely with foil, and let it rest for at least 30 minutes before carving.
- Carve and serve the turkey. Remember to reserve any juice and drippings to make homemade turkey gravy.
Notes
- If your turkey is larger than 14 pounds you’ll want to increase the herb butter mixture so that it can fully coat the skin. Add 2 additional tablespoons of butter (or olive oil) for every 2 extra pounds of turkey.
- Basting is optional. The butter under the skin does most of the work to keep the turkey moist. While you can base occasionally, opening the oven too often releases heat and can lengthen cooking time.
- Covering with foil. You want to start roasting the turkey uncovered so the skin can brown. Once it reaches a deep golden color, loosely tent the turkey with foil to prevent over-browning while the inside finishes cooking. If you have a roasting pan with a lid, use it instead of foil.
- Check for doneness early. Some ovens run up to 25 degrees hotter or cooler than the display suggests. Consider testing the “true” temperature of your oven before roasting your turkey using an oven thermometer.
- If the turkey finishes early, tightly tent it with foil and cover with clean towels, or hold it in a 200°F oven. It will stay warm and juicy for up to 1 hour while you finish the sides.
- Save the drippings. The flavorful pan juices make the best gravy. A complete pan gravy recipe is coming soon.
- Convection Oven: Convection ovens circulate hot air, so your turkey will cook faster and brown sooner. Use the same method and temperature, but start checking the internal temperature after 2 hours to prevent overcooking. Tent with foil if it browns too quickly.
- Electric Roaster Oven: Follow the same seasoning and cooking method. Electric roasters heat differently from traditional ovens, so rely on a meat thermometer to determine doneness rather than the clock.
- Disposable Roasting Pan: Elevate the turkey by placing 4 to 5 ribs of celery and 4 large carrots (cut into large chunks) on the bottom. This helps hot air circulate, prevents the bottom from steaming, and flavors the drippings for gravy.
Nutrition
Nutrition information is automatically calculated, so should only be used as an approximation.


Hi Jessica,
I just wanted you to know that I used your recipe for roasting the turkey this year and it was a smashing success! Everyone said it was the absolute best turkey they have ever had! The meat was so moist and flavorful! Your recipe and directions were so easy to follow it was hard to go wrong. I used a 12 # Butterball turkey.
I hope you and your family had a great Thanksgiving as well!
Regards,
DON JACOBS, FAIA
That is wonderful news! I’m so happy the turkey was a hit for your Thanksgiving dinner. This recipe always delivers.
Hope you had a lovely holiday too.
Thanks for letting me know! 🙂
Regarding the herb butter, since the seasonings are powdered or minced, wouldn’t it be easier and less a mess to melt and clarify the butter, add the ingredients and brush them on? Any drawbacks?
Thank you for this website!
Great question! You can absolutely melt or clarify the butter and brush it on if you prefer less mess, but I like to keep the herb butter soft and spreadable so it really clings to the skin and holds the garlic, herbs, and seasonings in place under and over the skin instead of running off into the pan.
Melted butter tends to slide off more quickly, so you do not get quite the same even coating or self-basting effect as it melts in the oven, but if you go that route I would just plan to brush it on a couple of times as it roasts. Thank you so much for the kind words and for cooking from my site! 🙂
Excellent! I wish I’d had such detailed instructions when I was younger.
Thanks Lois, I am glad you found my very detailed instructions helpful 🙂
Great recipes 🙏👍
Thanks Len 🙂